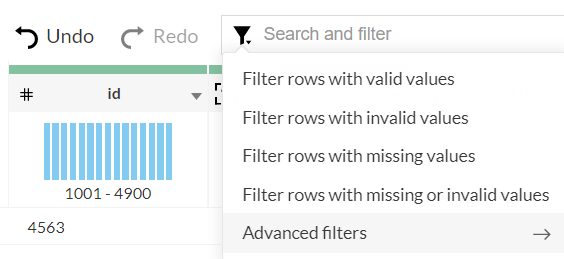
🔶Advanced filters
The Advanced filters option allows you to filter data based on custom conditions applied over one or more columns. The advanced filters is exploratory in nature and provides a way to filter your dataset without applying them as a rule.
However, you can choose to apply them as a rule by either keeping or deleting the filtered rows.
Note:
- All filters present will be automatically included when you open the Advanced filters pane.
- Including the ones that you add while having the pane open.
- You can also edit the filters in the Advanced filters pane.
👉 To apply advanced filters - Choose the Advanced filters option from the Search and filter box. The Advanced filters pane will slide open to view.
- Click the + icon to add columns to the filters. You can also reorder the filters using the drag and drop method.
- When you add more than one filter to the Filters section, the logical operators, AND or OR appear next to the filters. You can click to toggle the logical operator between AND and OR.
- Using the logical operators, you can combine the conditions and apply logic to determine the rule of precedence. The final expression is displayed in the Criteria expression box. You can click Edit to alter the default expression using logical operators and parenthesis to specify the precedence or the sequential order as to which condition should be evaluated first. Click Save after making the required changes.
For example, In the expression, ((1 OR 2) AND (3 OR 4)), first the condition ( 1 OR 2 ) will be executed and then, the condition ( 3 OR 4 ) will be executed next. Thirdly, since, the AND operator is used, the filter will be applied when both the conditions are true. - You can use the Clear button to remove all the filters.
- For every filter added, you can select one of the following options from the drop-down:
- Actual: This option lets you filter rows based on the actual values in the column.
- Data quality: This option lets you filter rows based on the quality of data in the column.
- Patterns: This option helps you filter rows based on the data patterns in the selected column.
- Seasonal: This option helps you filter rows based on the seasonal parameters such as quarter, month, week, etc.
- Outliers: This option allows you to filter rows based on the outliers present in the data of the selected column.
- Click the Filter button. The number of filters added will be shown in the chip that appears above the data grid.
- Advanced filters filter the data without applying any rule. After when you’re satisfied with your filtered data, you can choose to apply either Keep filtered rows or Delete filtered rows rule using the Actions dropdown.
🔶Topbar
The topbar in the Studio page has a dataset switcher on the left hand side and a menu bar on the right. Click the dropdown next to the dataset name in the top bar to switch to other datasets. This is particularly useful to resume the remaining data prep activities in other datasets instantly.
You can also use this dropdown to take a look at the data quality of other datasets. This helps you prioritize data preparation activities in the workspace.

