
WordPress to Zoho Campaigns Integration
A WordPress to Zoho Campaigns integration sends each form submission to Zoho Campaigns automatically, so new subscribers join your mailing lists without manual entry or code.
This guide shows how to set up the Zoho Campaigns action in FormBridge for Zoho: choose your connected account and the app, pick a mailing list, subscription type, when contacts join the list, topics and tags, turn on the duplicate check, map your form fields, then create and test the feed.
Supported form plugins and Zoho apps
FormBridge for Zoho is a WordPress plugin that connects your form plugin to Zoho apps without code. This guide covers the Zoho Campaigns action.
WordPress form plugins
- Elementor Forms
- Contact Form 7
- WPForms
- Gravity Forms
- Fluent Forms
- Ninja Forms
- Forminator Forms
- Formidable Forms
- Happyforms
- SureForms
Zoho apps
- Zoho CRM
- Zoho Bigin
- Zoho Books
- Zoho Desk
- Zoho Campaigns
- Zoho Marketing Automation
Before you start
- Your WordPress form is published, collects an email address, and its trigger is set up in FormBridge for Zoho.
- Your Zoho account is connected under FormBridge for Zoho → Connections. If it isn’t, follow the guide to creating a Zoho connection.
- The mailing list, topics and tags you want to use already exist in Zoho Campaigns.
How to connect WordPress forms to Zoho Campaigns
Once your form trigger is ready, follow these ten steps.
Step 1: Select your connected account
Zoho connection step › Connected accountOn the Zoho connection step, open the Connected account dropdown and choose the Zoho account you connected under FormBridge for Zoho → Connections.
No account in the list?Create a connection first, then return to the feed. Learn how to create a Zoho connection.
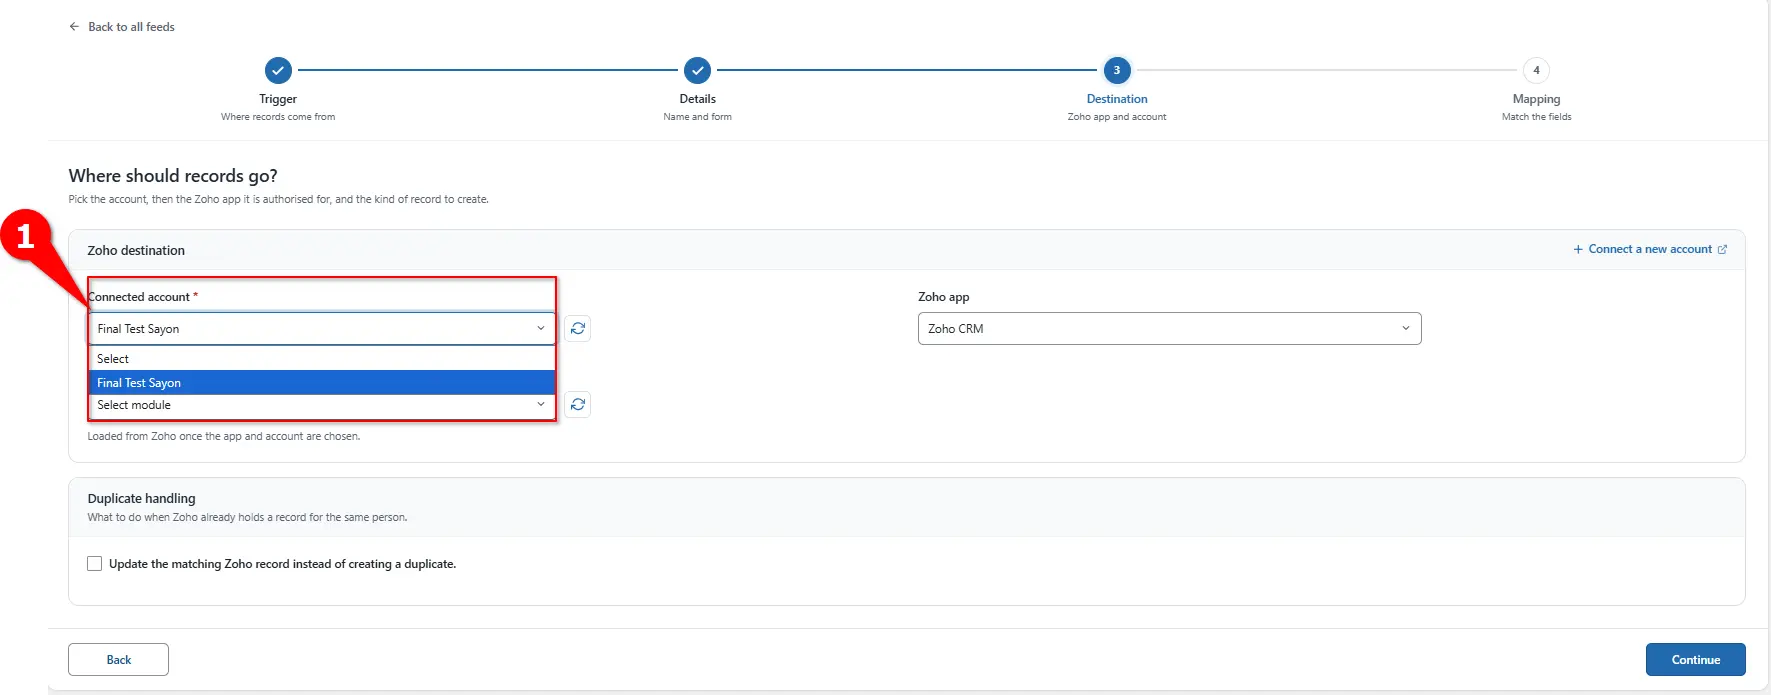
Choosing the connected Zoho account. Step 2: Select Zoho Campaigns as the Zoho app
Zoho connection step › Zoho AppNext, open the Zoho App dropdown and select Zoho Campaigns.
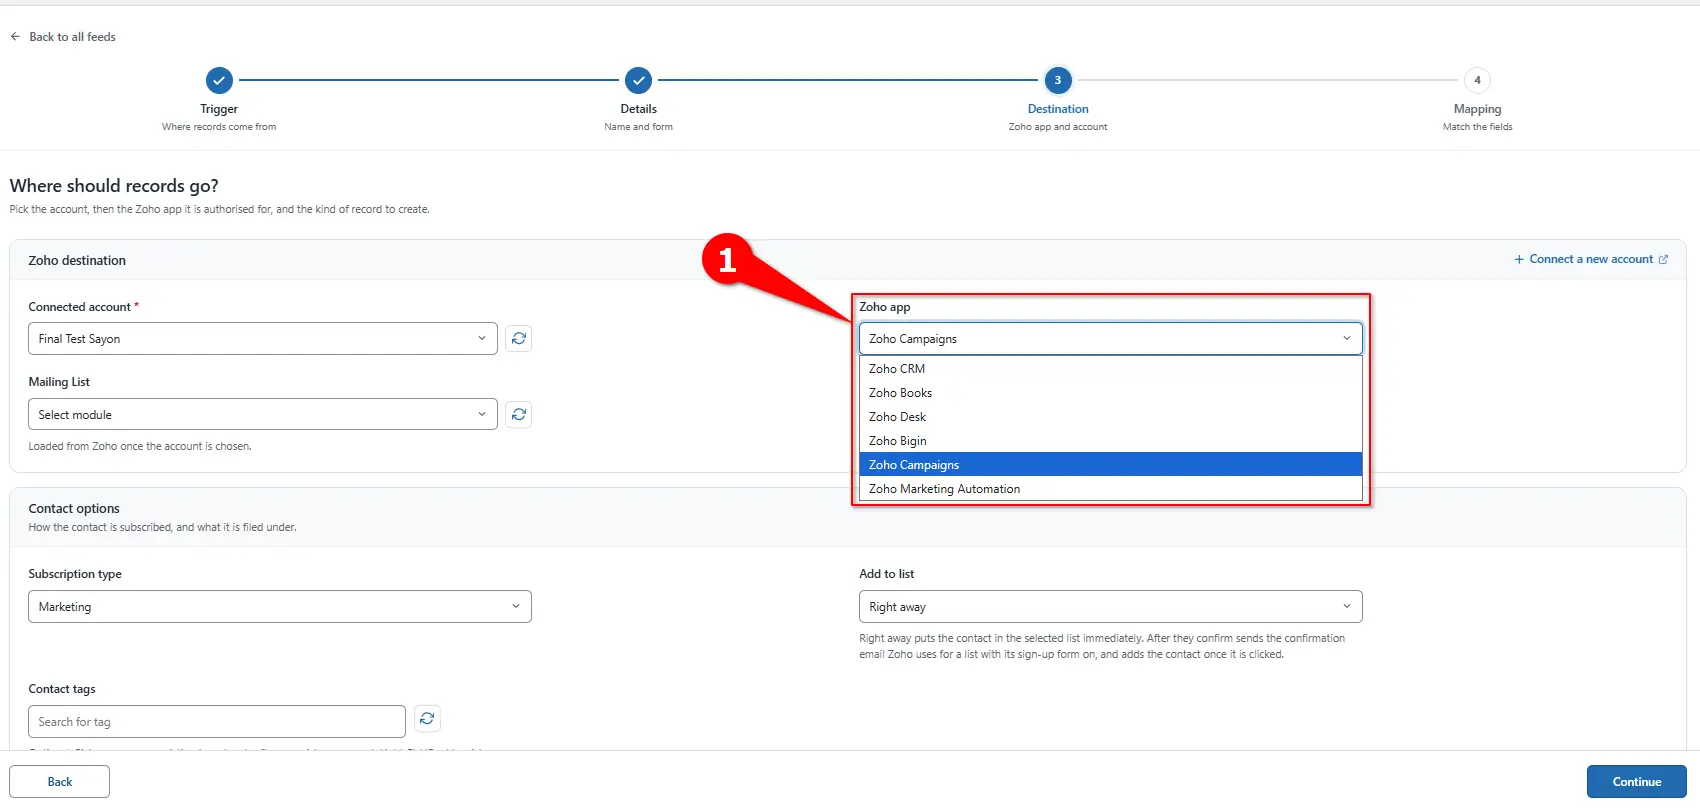
Selecting Zoho Campaigns as the Zoho app. Step 3: Select the mailing list
Zoho connection step › Mailing ListFrom the Mailing List dropdown, choose the list that new subscribers should be added to. The lists load from Zoho once the account is chosen.
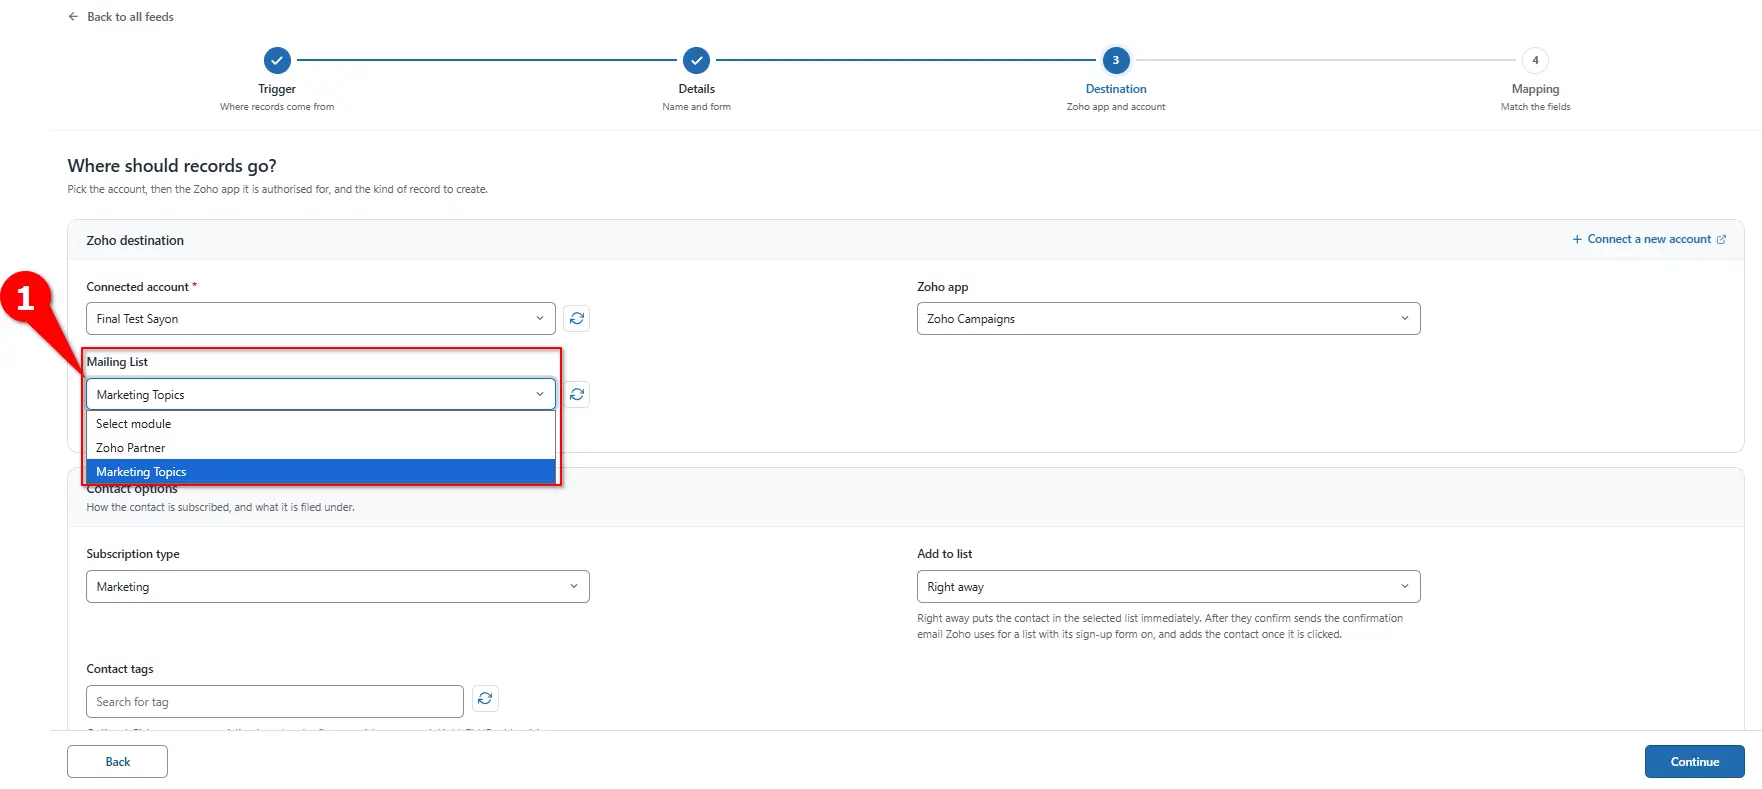
Choosing the mailing list for new subscribers. Step 4: Select the subscription type
Contact options › Subscription typeUnder Contact options, open the Subscription type dropdown and choose the email permission level for new subscribers.
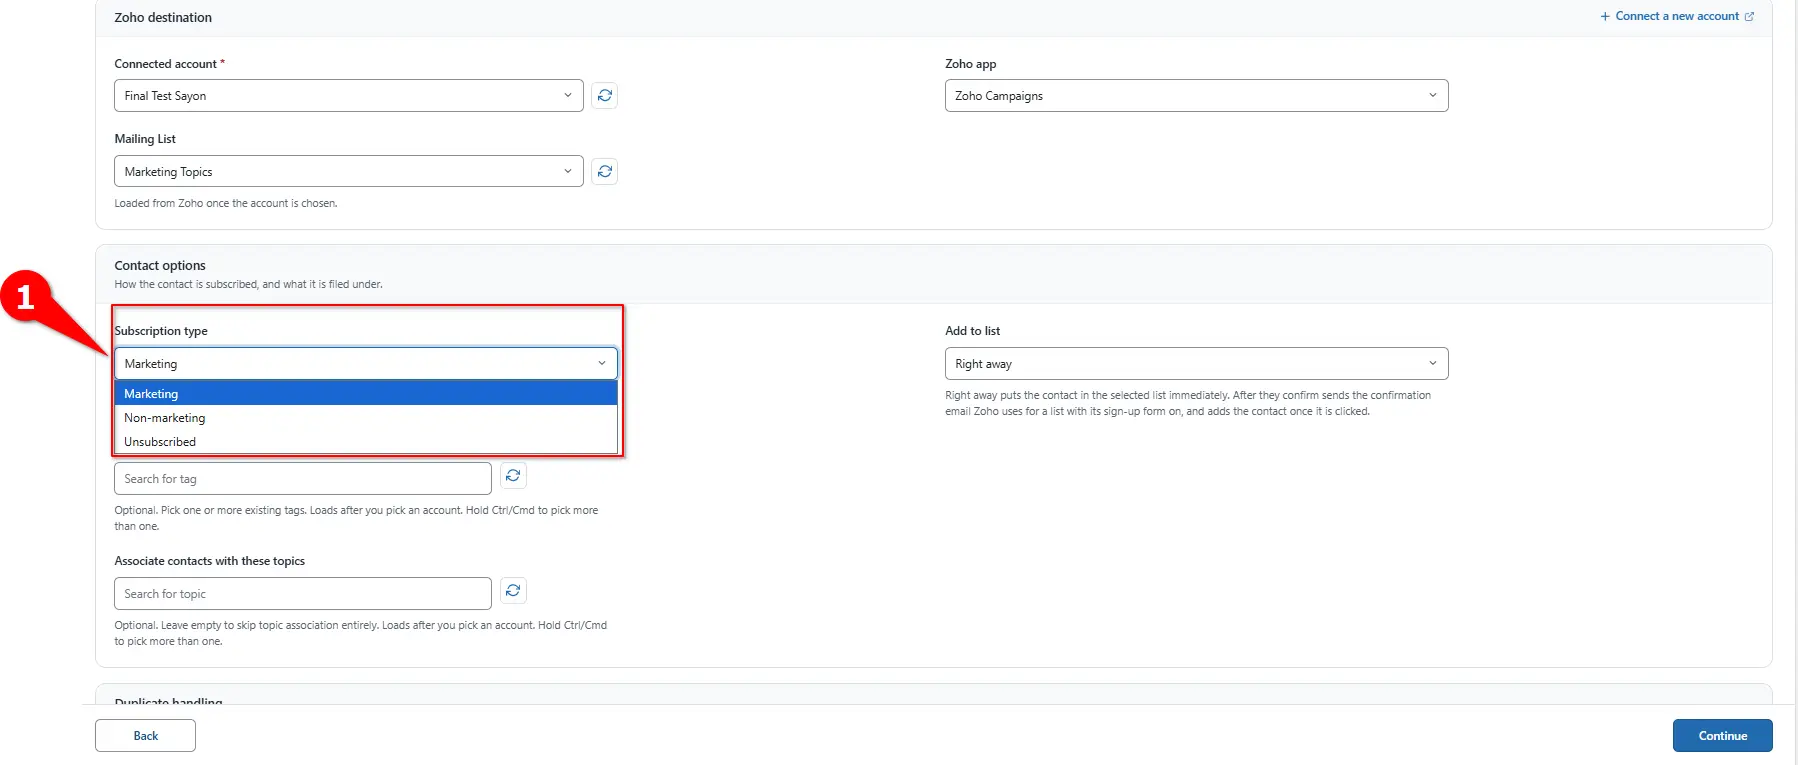
Choosing the subscription type. Step 5: Choose when contacts are added to the list
Contact options › Add to listFrom the Add to list dropdown, choose when new subscribers join the mailing list:
- Right away adds the contact to the list as soon as the form is submitted.
- After they confirm by email sends the contact a confirmation email from Zoho first. The contact joins the list only after confirming.
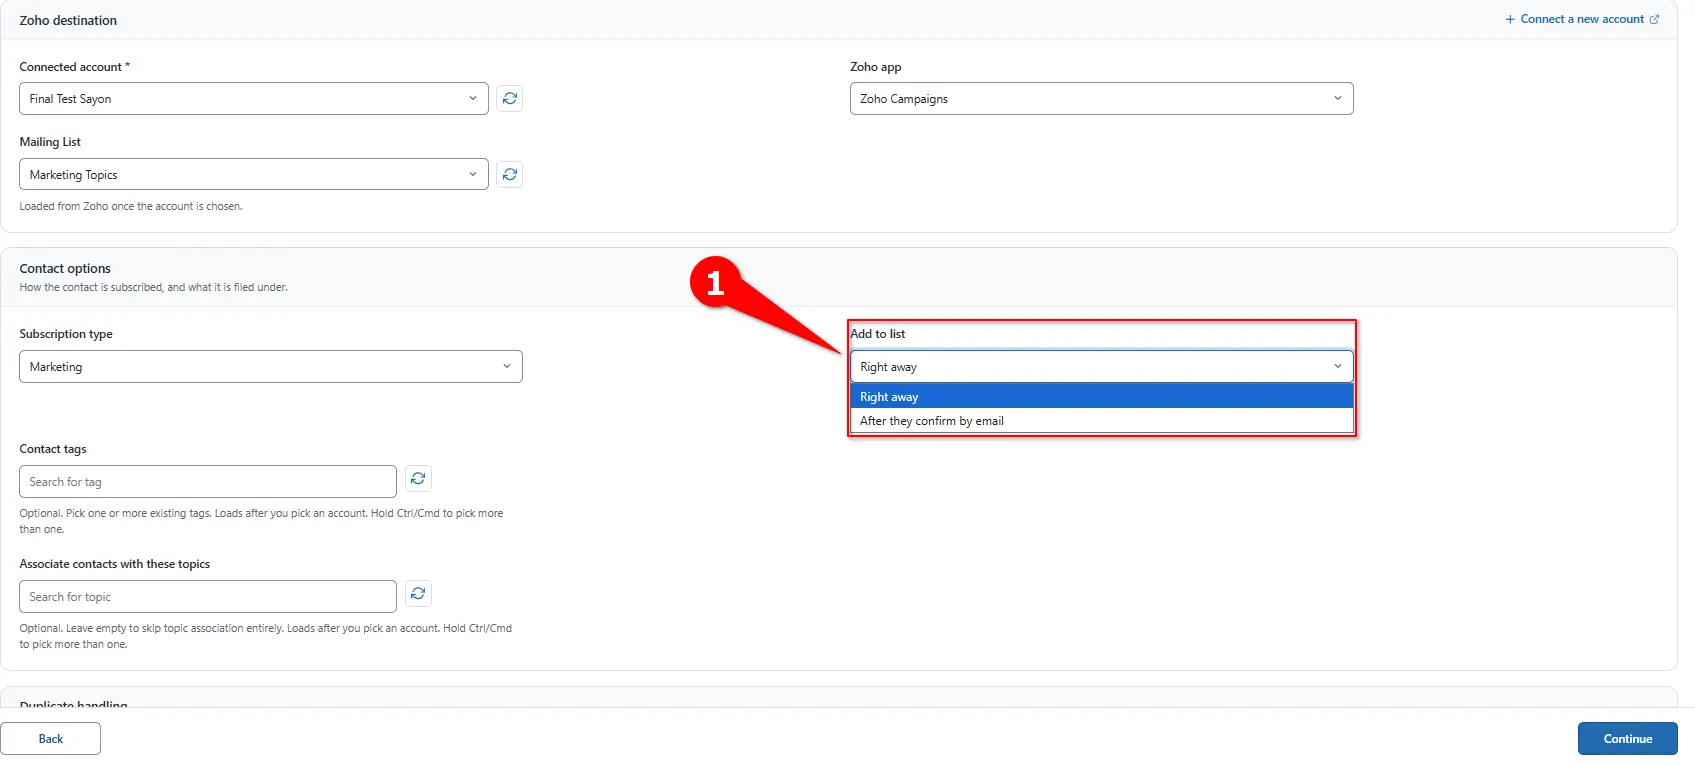
Choosing when new subscribers are added to the mailing list. Step 6: Choose topics
Contact options › TopicsIn the Associate contacts with these topics field, choose the topics new subscribers should be linked to. Subscribers then receive emails only about the topics they chose, which keeps your campaigns targeted. Hold Ctrl or Cmd to pick more than one.
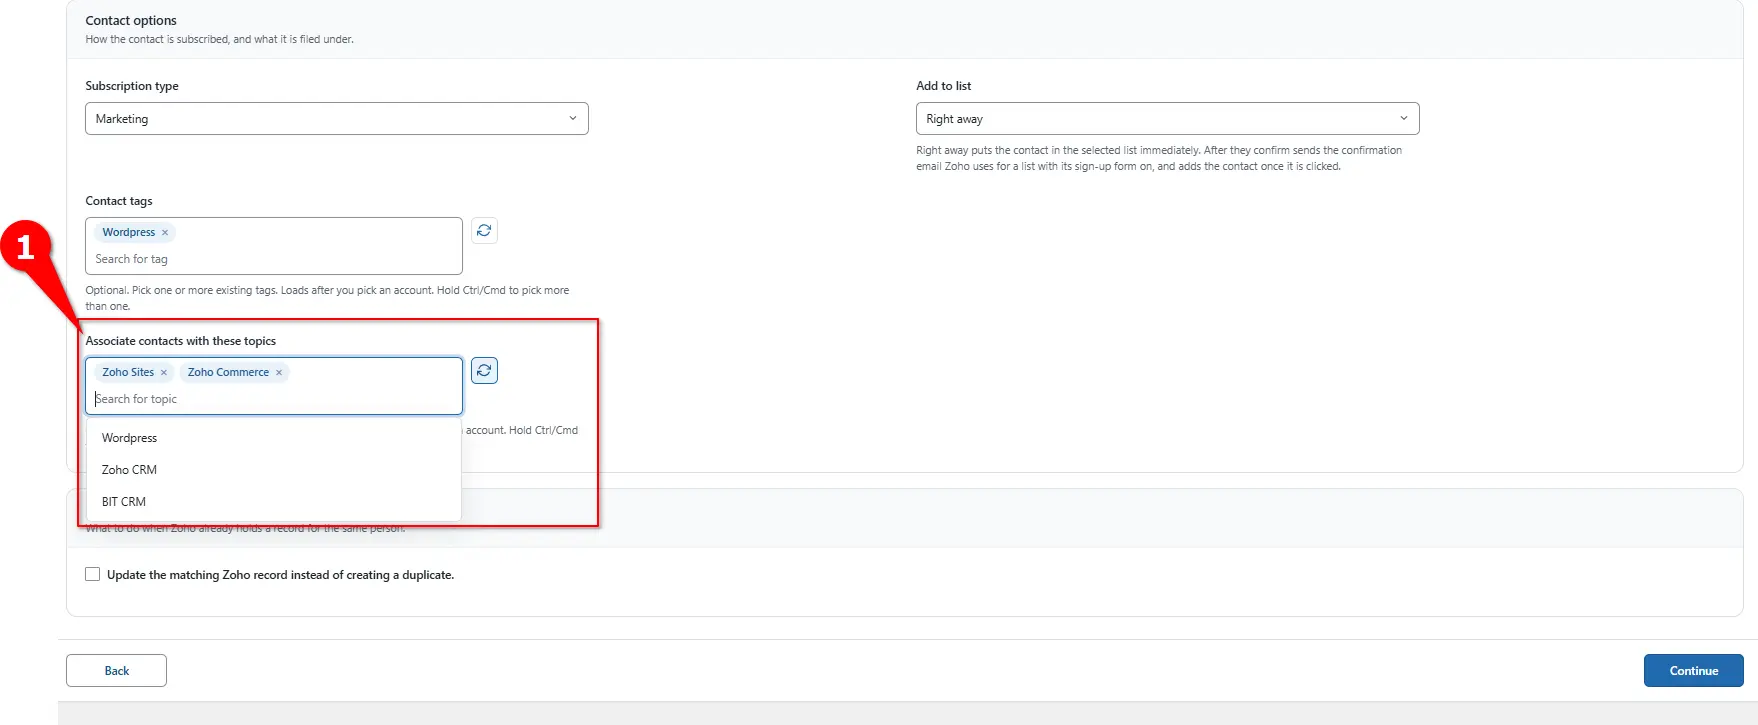
Choosing topics for new subscribers. Step 7: Add contact tags
Contact options › Contact TagsIn the Contact Tags field, select tags to apply to new subscribers. Tags make it easy to segment contacts, for example by the form they submitted or their lead source.
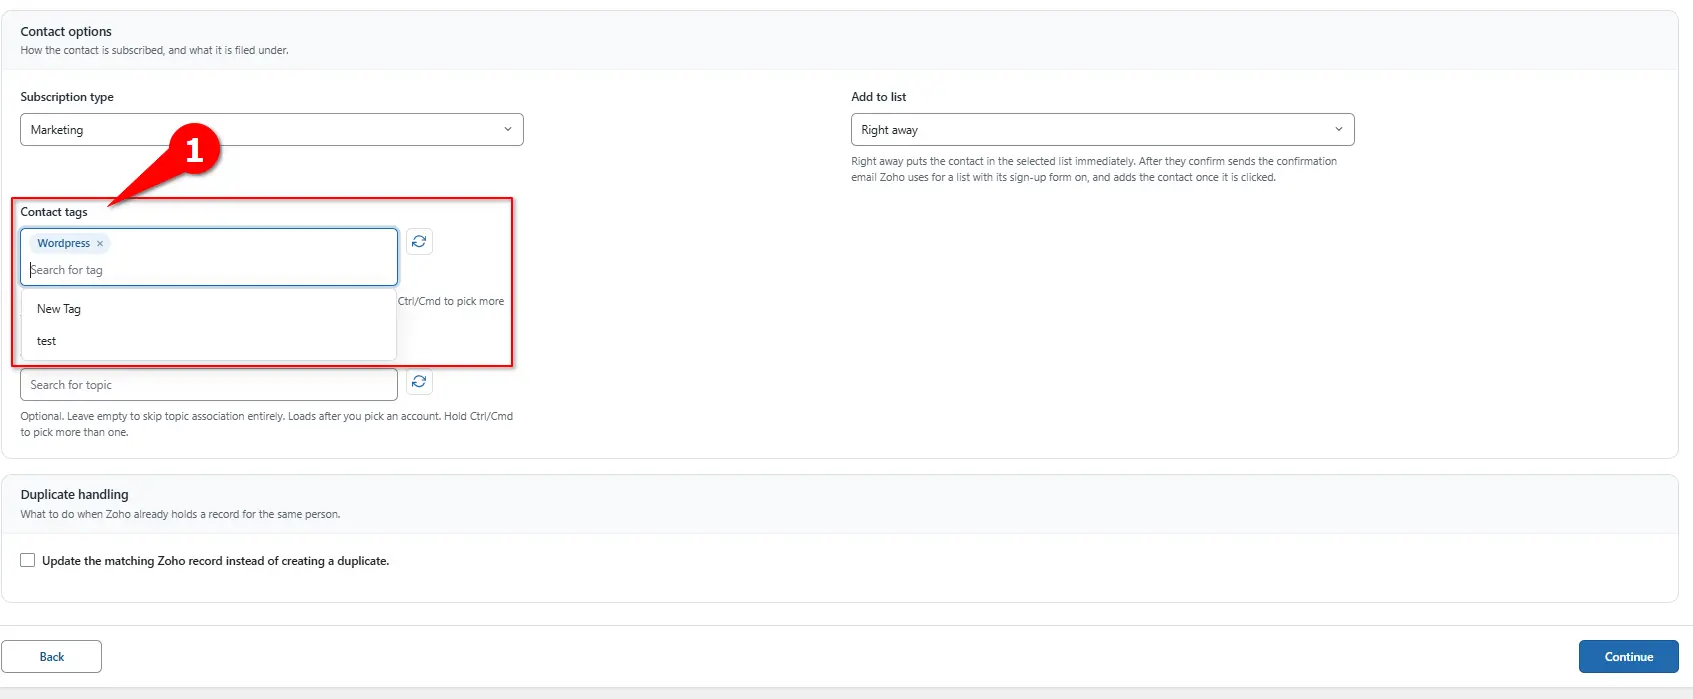
Adding contact tags to new subscribers. Step 8: Turn on the duplicate check
Zoho connection step › Duplicate CheckThe duplicate check looks for an existing contact that matches the submission, based on email, name or another field. When it finds a match, FormBridge updates that contact instead of creating a new one.
Turn it on if you want existing contacts updated, then click Continue.
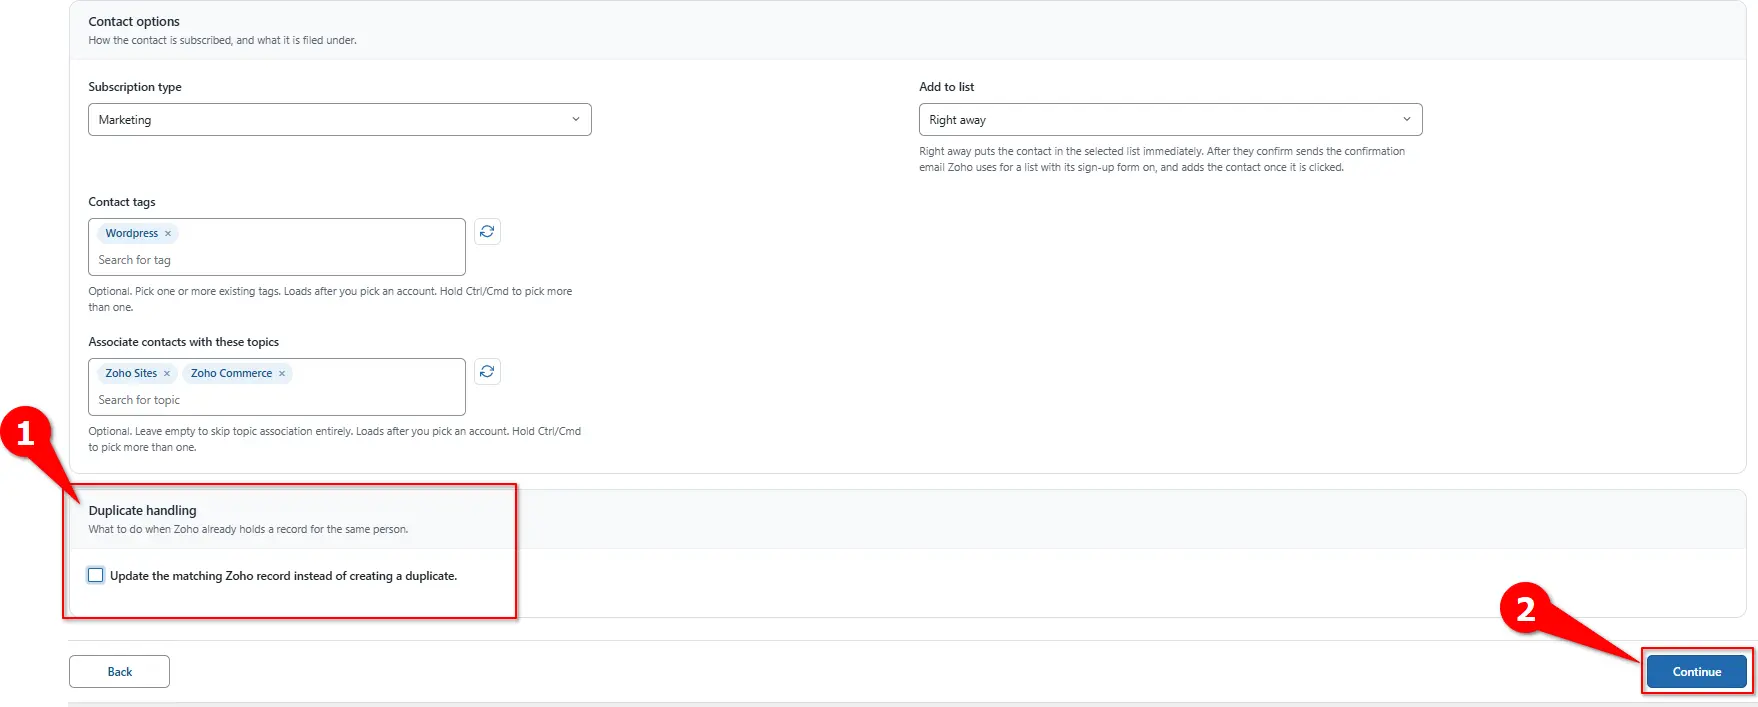
Turning on the duplicate check. Step 9: Map your form fields
Mapping step › Field MappingMatch each WordPress form field to the Zoho Campaigns field that should store its value. Click Add Mapping Row to map more fields.
Map the email addressZoho Campaigns identifies contacts by email address, so always map your form’s email field. Map any other required fields too, or the contact won’t be added.
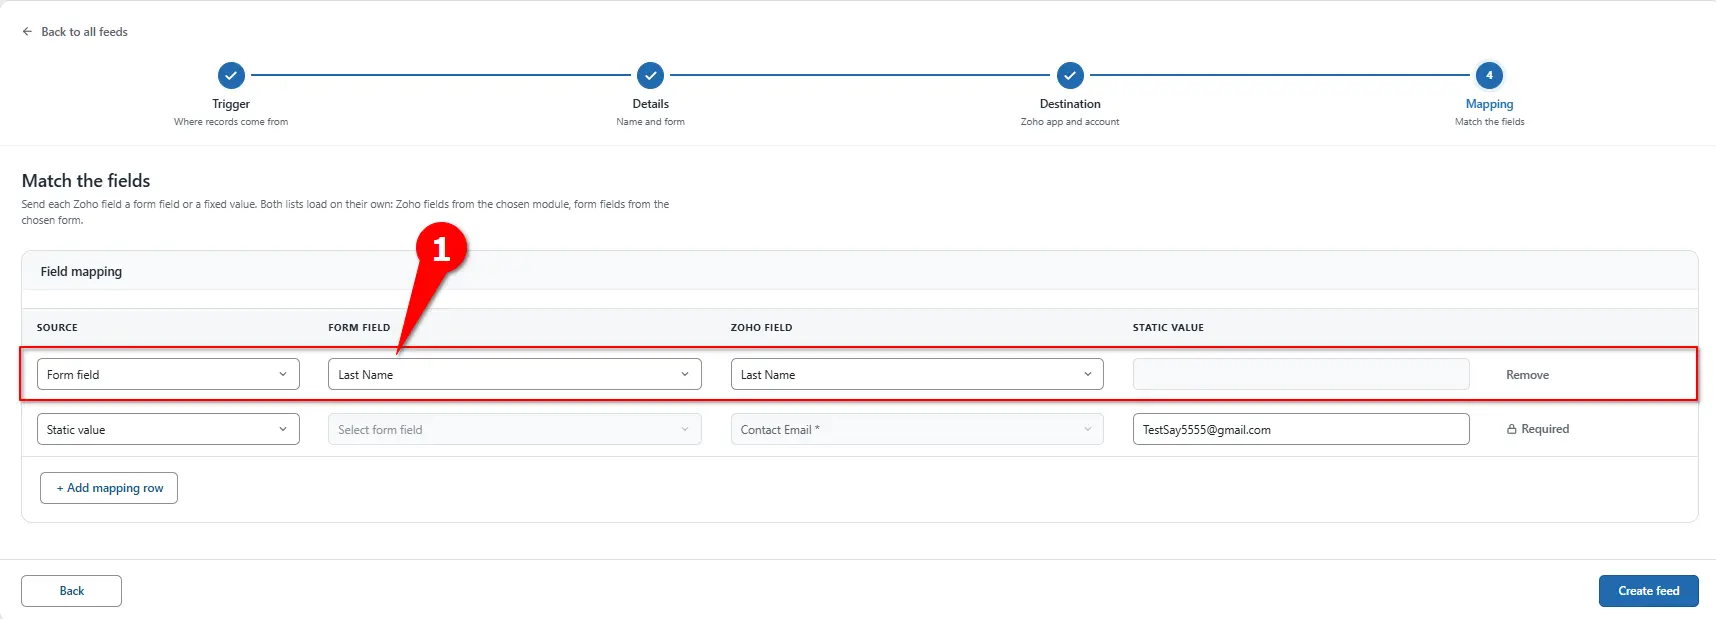
Mapping WordPress form fields to Zoho Campaigns fields. Step 10: Create the feed and test it
Mapping step › Create feedIf a field should always get the same value, enter a static value in its mapping row instead of choosing a form field. When the required fields are mapped, click Create feed.
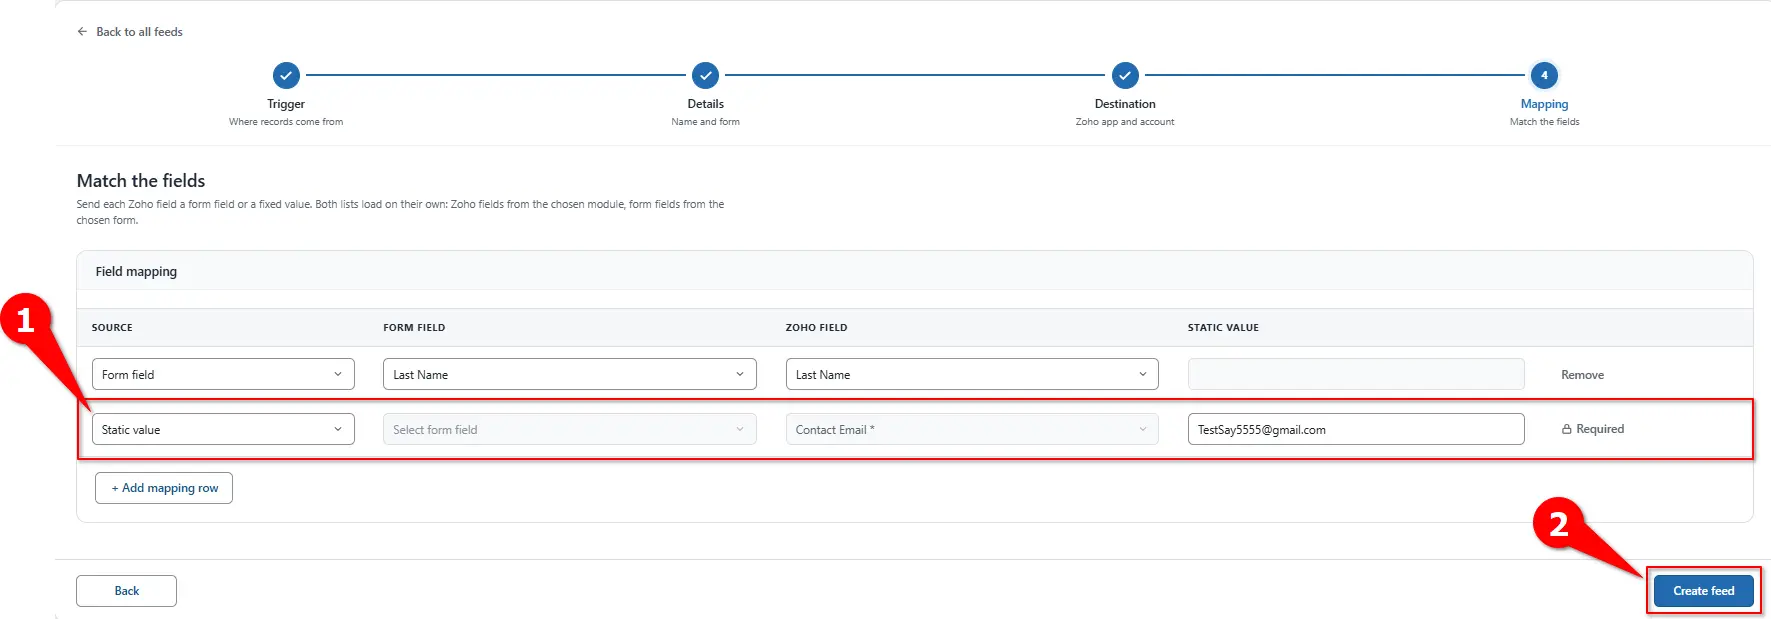
Adding a static value and creating the feed. Submit the selected form with test data to confirm the connection works.
Delivery logsEvery delivery, successful or failed, is recorded under FormBridge for Zoho → Logs. Failed deliveries can be sent again with Resubmit.
- One feed listens to exactly one form. If two forms should send subscribers to Zoho Campaigns, create two feeds.
- Changing the Zoho app, account or list after mapping clears the mapping rows, so set those first.
- To see exact Zoho Campaigns field API names, go to FormBridge for Zoho → Connections and click Modules & Fields for the account.
Verify the integration
- Submit a test entry using an email address you can recognise.
- Check the log under FormBridge for Zoho → Logs and confirm the delivery succeeded.
- Find the contact in the mailing list you selected by searching for the test email. If you chose After they confirm by email, confirm the test email first.
- Check the details: subscription type, topics, tags and any static values.
- Submit the same email again. The existing contact should update rather than appear twice.
Troubleshooting
Pick the symptom you’re seeing to get the fix.
No contact is added
- Likely cause
- The email field or another required field isn’t mapped.
- How to fix it
- Map your form’s email field and every other required field, then check the Logs screen for the error returned by Zoho Campaigns.
Added to the wrong list
- Likely cause
- A different mailing list was selected in the feed.
- How to fix it
- Edit the feed and choose the correct mailing list in Step 3.
Contact not in the list yet
- Likely cause
- Add to list is set to After they confirm by email, and the contact hasn’t confirmed yet.
- How to fix it
- Ask the contact to confirm the email from Zoho, or choose Right away in Step 5 if confirmation isn’t needed.
Mapping rows cleared
- Likely cause
- The app, account or list changed after mapping.
- How to fix it
- Set the app, account and list first, then map the fields.
Field name not found
- Likely cause
- The API name doesn’t exist in Zoho Campaigns.
- How to fix it
- Check the correct name under FormBridge for Zoho → Connections → Modules & Fields.
Still stuck? Email the failed entry from the Logs screen to support@techwavesolutions.net.
Frequently asked questions
What is the difference between Right away and After they confirm by email?
Right away adds new subscribers to the mailing list as soon as the form is submitted. After they confirm by email sends each subscriber a confirmation email from Zoho first, and adds them only after they confirm.
What is the difference between topics and tags in Zoho Campaigns?
Topics control which kinds of emails a subscriber receives, so they only get emails about topics they chose. Tags label contacts so you can segment them, for example by form or lead source.
What happens if the same email is submitted again?
Zoho Campaigns identifies contacts by email address, so sending the same address again updates the existing contact instead of creating a duplicate.
Can two forms send subscribers to Zoho Campaigns?
Yes. Each feed listens to exactly one form, so create a separate feed for each form.
Where do I find Zoho Campaigns field API names?
Go to FormBridge for Zoho → Connections and click Modules & Fields for the connected account.
