
WordPress to Webhook Integration
A WordPress webhook integration sends each form submission to any URL you choose, such as your own API, Make, n8n, Zapier or another CRM, automatically and without code.
This guide shows how to set up the Webhook action in FormBridge for Zoho Pro: switch the destination to Webhook, enter the URL, build the request body, add headers and authentication, send a test, then create the feed.
Supported triggers and destinations
FormBridge for Zoho is a WordPress plugin that connects your forms to Zoho apps without code. With Pro, a feed can also send to a URL that isn’t Zoho at all. This guide covers that Webhook action.
WordPress triggers
- Elementor Forms
- Contact Form 7
- WPForms
- Gravity Forms
- Fluent Forms
- Ninja Forms
- Forminator Forms
- Formidable Forms
- Happyforms
- SureForms
- Divi forms
- Every Pro trigger
Webhook destinations
- Your own API
- Make
- n8n
- Zapier
- Pabbly Connect
- Any HTTP endpoint
Before you start
- FormBridge for Zoho Pro is installed and its licence is active. The Webhook action is a Pro feature.
- Your WordPress form is published and its trigger is set up in FormBridge for Zoho.
- You have the webhook URL and know what the receiving service expects: the method, the body format, and any key or token it needs.
A webhook feed sends to a URL, not to a Zoho account, so it doesn’t use a connection from FormBridge for Zoho → Connections.
How to send WordPress form data to a webhook
Once your form trigger is ready, follow these seven steps.
Step 1: Switch the destination to Webhook
Destination step › Zoho app / WebhookOn the Destination step, click Webhook in the top-right switch. The Zoho settings give way to the webhook builder. A webhook feed has no separate Mapping step: the body you build here decides which answer goes where.
Choose the method (POST, PUT, PATCH, GET or DELETE) and paste the webhook URL into the address bar.

Switching to Webhook and entering the URL. Step 2: Build the request body
Destination step › BodyOn the Body tab, choose the format the receiving service expects, then write the body. Wherever you want a form answer, use its field ID in double braces, such as
{{your-email}}. When the form is submitted, each placeholder is replaced with what the visitor typed.- Insert a form field + Add to body adds a field for you, or All fields.
- Sample writes a starter body with every field of the form.
- Format tidies the JSON, and the line under the editor tells you whether it is valid.
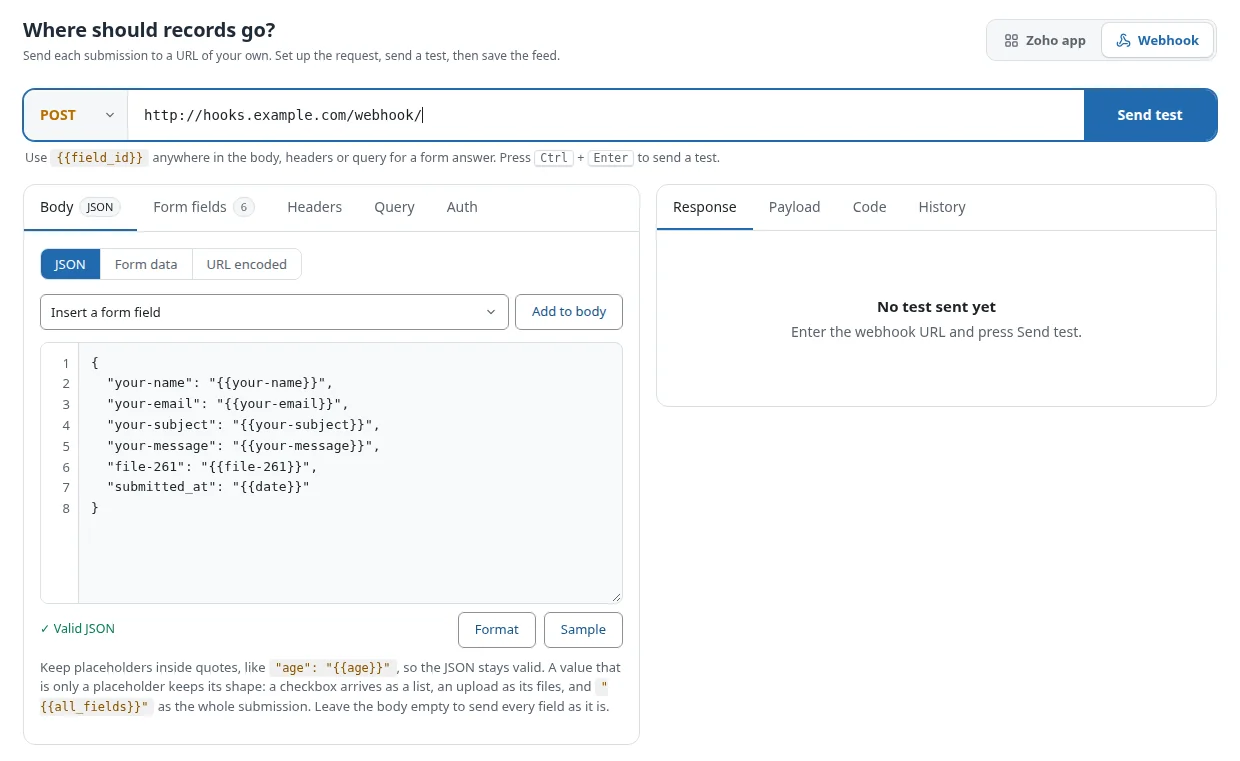
A JSON body built from the form’s fields. Body formats Format Use it for Content-Type JSON Most APIs and automation tools application/jsonForm data Forms with file uploads: pick File and choose the upload field multipart/form-dataURL encoded Endpoints that expect a classic form post application/x-www-form-urlencodedPlaceholders Placeholder Becomes {{field_id}}The answer to that form field {{all_fields}}The whole submission, as one object {{date}}The time it was sent, in ISO 8601 (UTC) {{timestamp}}The same time as a Unix timestamp {{uuid}}A new random ID for every request Keep placeholders inside quotes- Write
"email": "{{your-email}}", so the JSON stays valid. - A value that is only a placeholder keeps its type: a checkbox arrives as a list and an upload as its files.
- Leave the body empty to send every field as it is.
- GET and DELETE send no body; what you set up here goes in the query string instead.
Step 3: Check the form fields
Destination step › Form fieldsThe Form fields tab lists every placeholder used in the body, headers and query. Type test values here, or click Fill sample values, to try the request before any real submission. Test values are not saved.
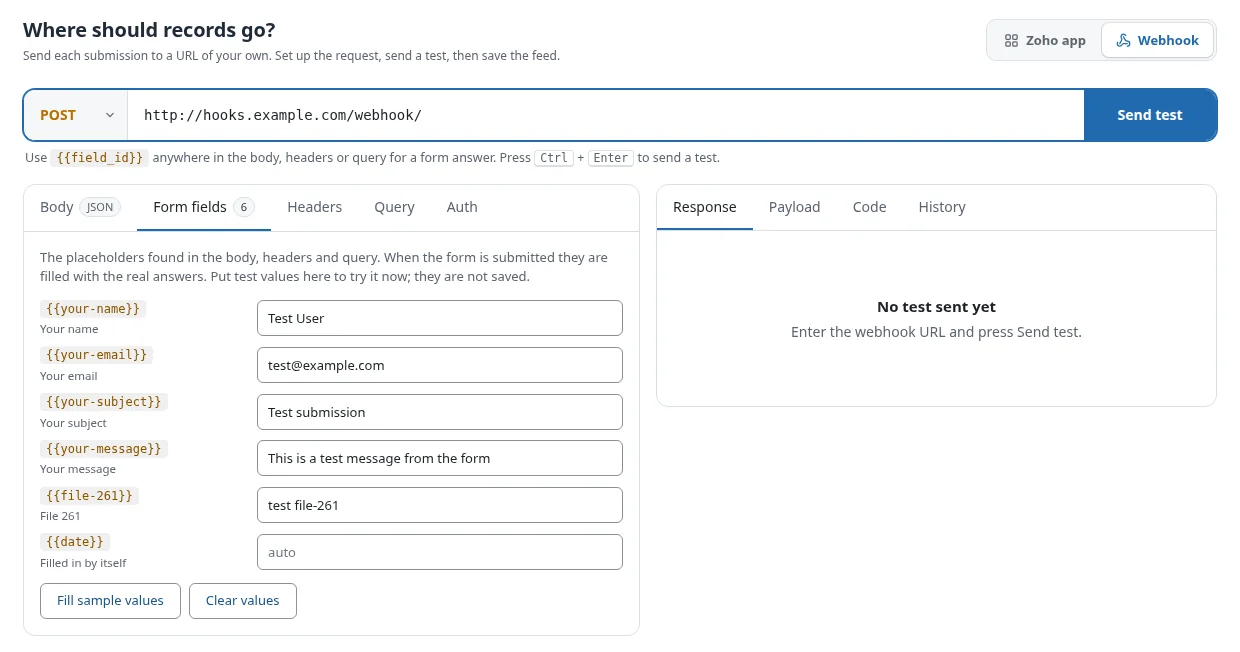
Test values for each placeholder. Step 4: Add headers
Destination step › HeadersIf the service needs headers, add one per row on the Headers tab. Quick buttons add common ones: Webhook secret, Accept JSON, Source and Request ID. Use Bulk edit to paste many at once. Headers that FormBridge adds itself, such as Content-Type, are listed under Added automatically.
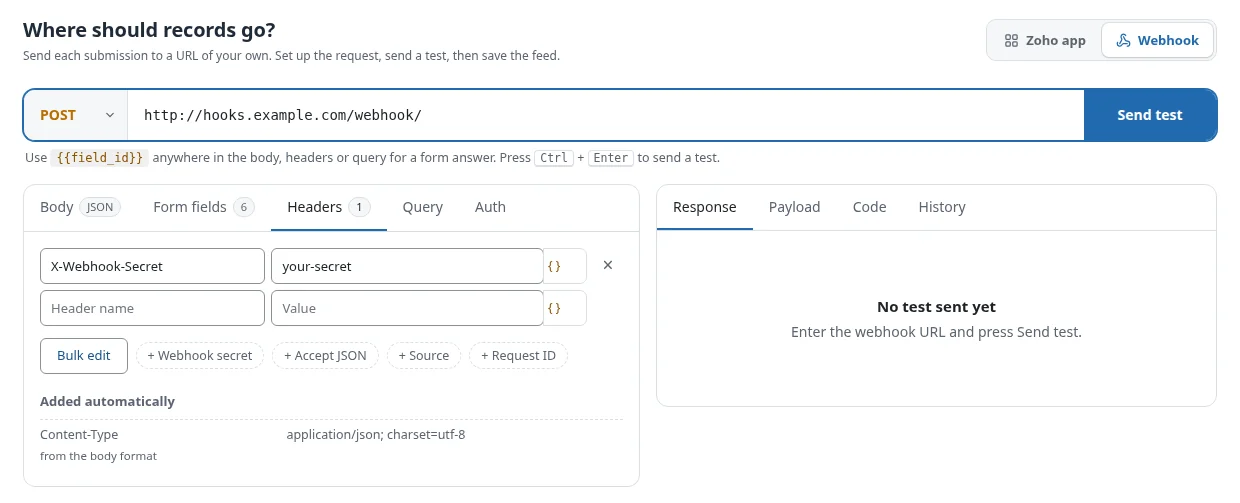
Adding a webhook secret header. To add values to the end of the URL instead, use the Query tab.
Step 5: Set up authentication
Destination step › AuthIf the endpoint is protected, open the Auth tab and choose Bearer token, Basic (username + password) or API key. An API key can be sent in a header or in the URL. FormBridge adds it to every request for you.
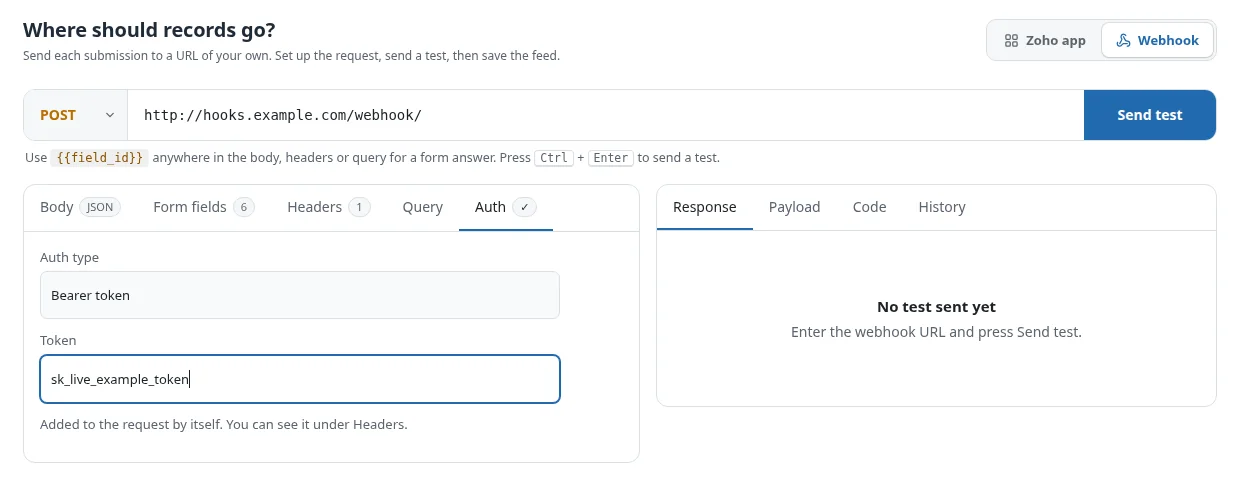
Using a bearer token. Step 6: Send a test
Destination step › Send testClick Send test, or press Ctrl + Enter. The Response tab shows the status code, the time it took, and the body and headers the service answered with. A 2xx status, such as 200 or 201, means the endpoint accepted it.
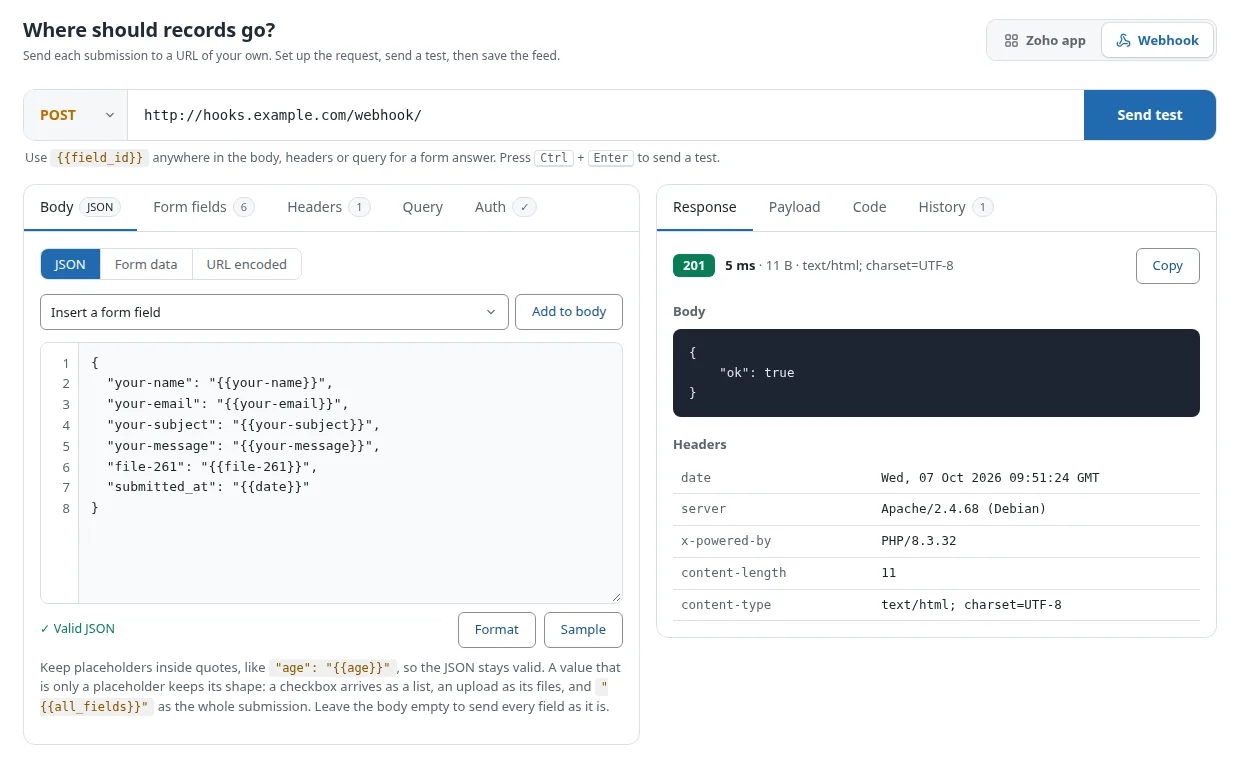
A successful test: the endpoint answered 201. The other output tabs help too: Payload shows exactly what was sent, Code gives the same request as cURL, fetch, PHP or Python, and History keeps your recent tests in this browser.
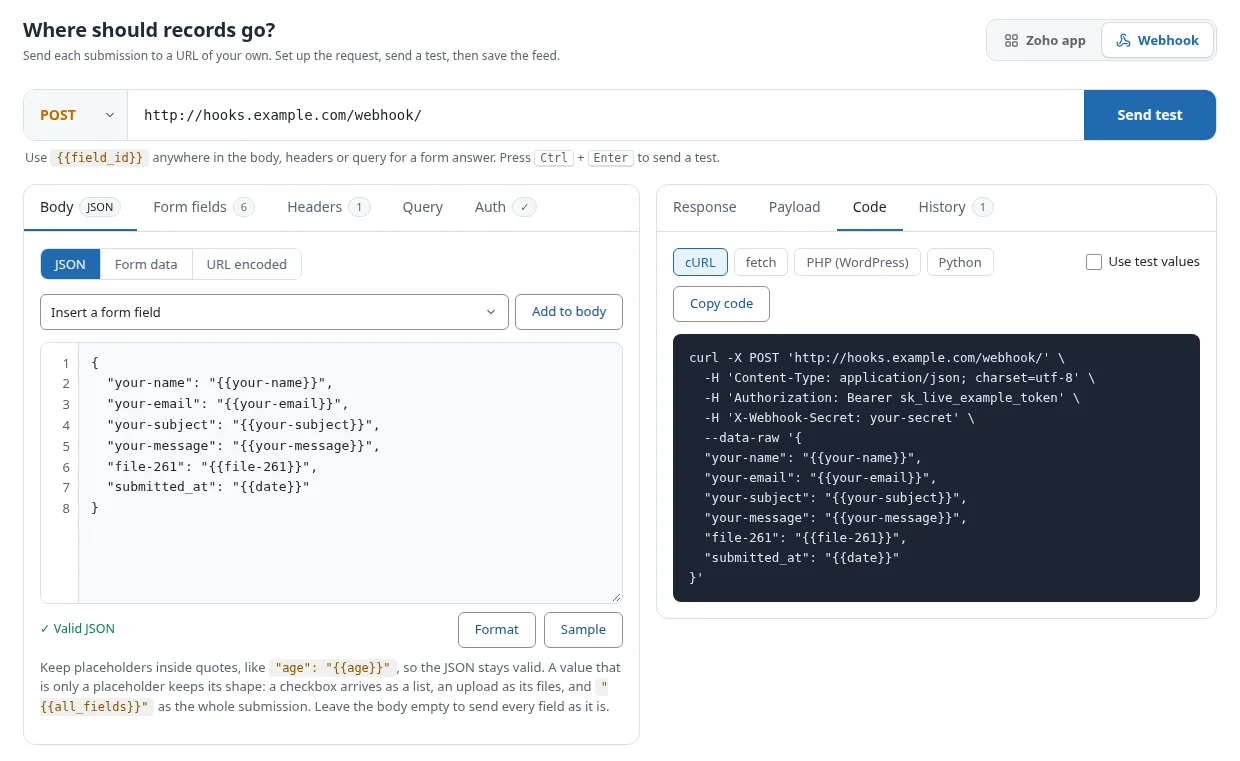
The same request as a cURL command. Step 7: Create the feed
Destination step › Create feedWhen the test works, click Create feed at the bottom of the step (Save feed when editing). To send only some submissions, turn on Conditional logic, which sits under the builder on a webhook feed, before you save.
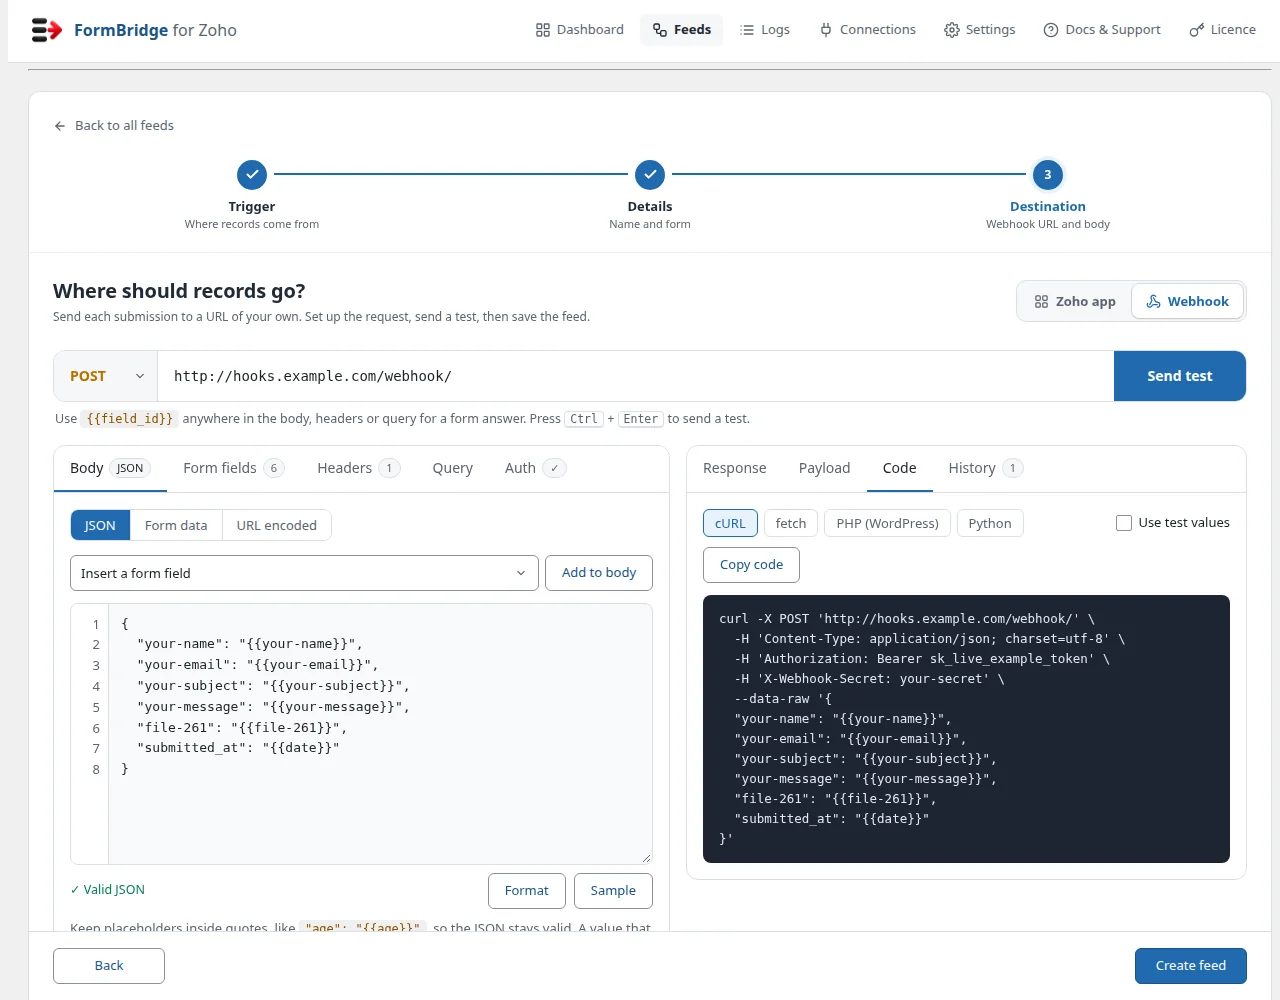
Creating the webhook feed. Delivery logsEvery delivery is recorded under FormBridge for Zoho → Logs, for example Sent to My CRM, which answered 201. Failed deliveries can be sent again with Resubmit.
- Any 2xx answer is a success. A 4xx answer (such as 400 or 422) is logged straight away and not retried, because it would fail the same way again.
- A 5xx answer, a 429 or a network error is retried in the background, up to 4 attempts in total: after 30 seconds, 2 minutes and 8 minutes.
- Each request waits up to 15 seconds for an answer.
- An upload arrives as a list of files with
name,type,sizeandurl. A file with no public link is included as base64content, up to 5 MB. - To send the same form to Zoho and to a webhook, create two feeds for that form.
Verify the integration
- Submit a test entry on the real form, using values you can recognise.
- Check the log under FormBridge for Zoho → Logs and confirm it says Sent to …, which answered 2xx.
- Find the request in the receiving service, for example the run history in Make, n8n or Zapier.
- Check the values, including checkboxes, uploads and any
{{date}}or{{uuid}}values.
Troubleshooting
Pick the symptom you’re seeing to get the fix.
Request failed
- Likely cause
- The URL is wrong, or your server can’t reach it (DNS, firewall, or an invalid SSL certificate).
- How to fix it
- Check the URL and its http or https, then open it from another tool to confirm it is reachable. The message under Response says why the connection failed.
Error 401 / 403
- Likely cause
- The key, token or password is missing or wrong.
- How to fix it
- Check the Auth tab, then look at Headers → Added automatically to see exactly what is sent.
Error 400 / 422
- Likely cause
- The service expects a different body format or different field names.
- How to fix it
- Compare the Payload tab with the service’s documentation, and check the body format (JSON, Form data or URL encoded).
Invalid JSON body
- Likely cause
- A missing quote or comma, or a placeholder outside quotes.
- How to fix it
- Open the Body tab, put quotes around every placeholder and click Format.
Nothing arrives
- Likely cause
- The feed is turned off, it listens to a different form, or its conditions skipped the submission.
- How to fix it
- Check that the feed is enabled and points at the right form, and review its conditional logic. Then check the Logs screen.
Still stuck? Email the failed entry from the Logs screen to support@techwavesolutions.net.
Frequently asked questions
Can I send WordPress form data to Make, n8n or Zapier?
Yes. Create a webhook trigger in Make, n8n or Zapier, copy its URL, and paste it into the Webhook action. Send a test so the tool can learn the fields.
Do I need a Zoho connection for a webhook feed?
No. A webhook feed sends to a URL, not to a Zoho account, so no connection is needed.
Can I send file uploads to a webhook?
Yes. In JSON, an upload arrives as a list of files with a link to each. With the Form data format, pick File in a row and choose the upload field to send the file itself.
Can one form send data to Zoho and a webhook?
Yes. Each feed has one destination, so create two feeds for the same form: one for the Zoho app and one for the webhook.
Are failed webhook deliveries retried?
Yes, when the problem may pass: a 5xx answer, a 429 or a network error is retried up to 4 attempts in total. A 4xx answer is logged straight away, and you can resend it from the Logs screen after fixing the cause.
