
WordPress to Zoho Sheet Integration
FormBridge for Zoho Pro
A WordPress to Zoho Sheet integration writes each form submission as a row in your Zoho Sheet workbook, so every entry is collected in one spreadsheet without manual entry or code.
This guide shows how to set up the Zoho Sheet destination in FormBridge for Zoho: choose your account and the app, pick the workbook and sheet, handle duplicates, map your fields to the columns, add optional conditional logic, then test and save the feed.
The Zoho Sheet destination is part of FormBridge for Zoho Pro. See how to install Pro and activate your licence.
Supported form plugins and Zoho apps
FormBridge for Zoho connects these WordPress form plugins with your Zoho apps. This guide covers the Zoho Sheet destination.
WordPress form plugins
- Elementor Forms
- Contact Form 7
- WPForms
- Gravity Forms
- Fluent Forms
- Ninja Forms
- Forminator Forms
- Formidable Forms
- Happyforms
- SureForms
Zoho apps
- Zoho CRM
- Zoho Books
- Zoho Desk
- Zoho Bigin
- Zoho Campaigns
- Zoho Marketing Automation
- Zoho Inventory
- Zoho FSM
- Zoho People
- Zoho Creator
- Zoho Recruit
- Zoho Projects
- Zoho Sheet
Before you start
- FormBridge for Zoho Pro is installed and your licence is active.
- Your WordPress form is published and its trigger is set up in FormBridge for Zoho.
- Your Zoho account is authorised for Zoho Sheet under FormBridge for Zoho → Connections. If it isn’t, follow the guide to creating a Zoho connection.
- The workbook exists and its first row holds clear column headers, because those headers become the fields you map to.
How to set up a WordPress to Zoho Sheet integration
Once your form trigger and feed details are ready, follow these ten steps.
Step 1: Select your account
Destination › AccountOn the Destination step, open the Account dropdown and choose the Zoho account you authorised under FormBridge for Zoho → Connections. Rows are written to this account.
No account in the list?Use Connect account at the top of the panel, or create the connection first and return to the feed. Learn how to create a Zoho connection.
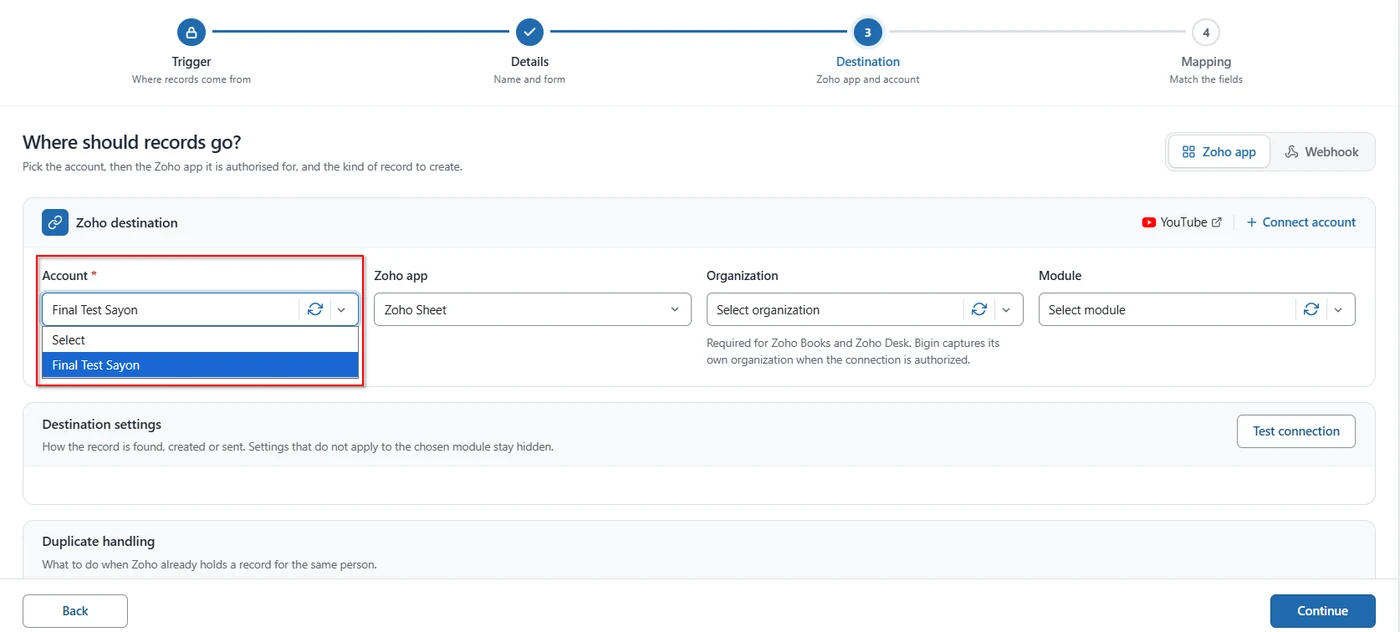
Choosing the connected Zoho account. Step 2: Select Zoho Sheet as the Zoho app
Destination › Zoho appOpen the Zoho app dropdown and select Zoho Sheet. The dropdown lists every app your account is authorised for.
Zoho Sheet not in the list?The connection must include Zoho Sheet. Open FormBridge for Zoho → Connections, choose Edit access for the account, tick Zoho Sheet and reauthorise. Zoho grants only the permissions asked for when a connection is made.
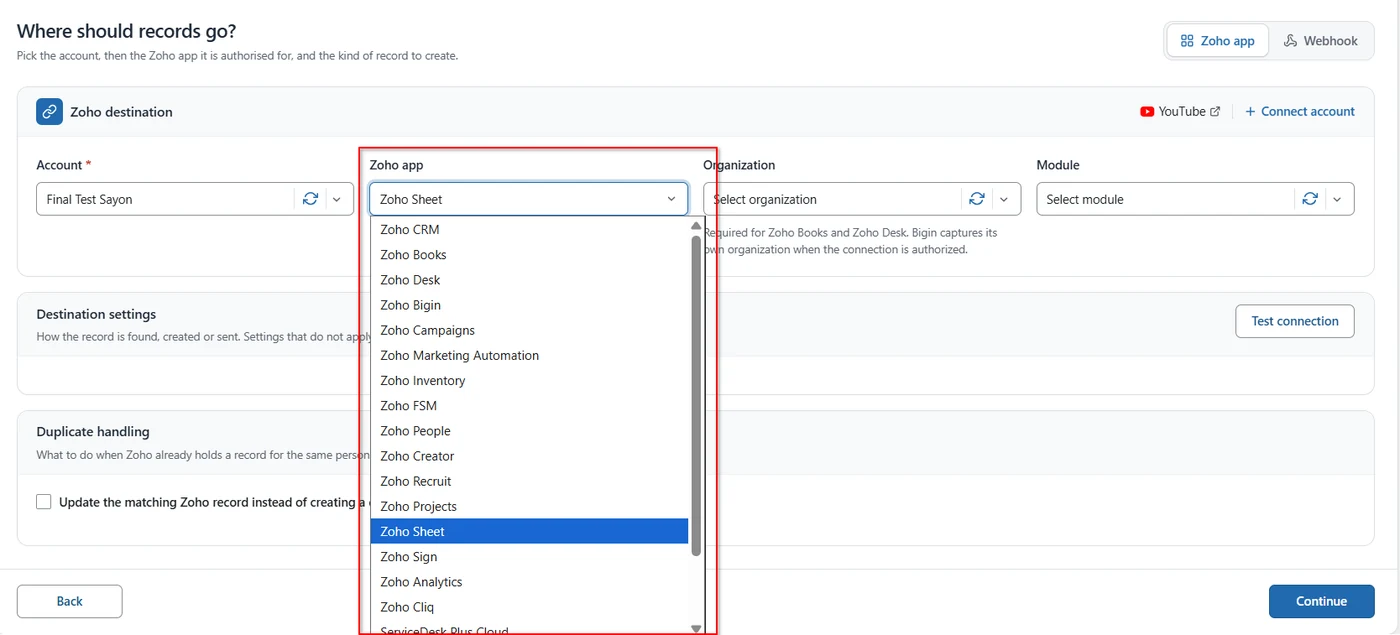
Selecting Zoho Sheet as the Zoho app. Step 3: Select the workbook
Destination › OrganizationFrom the Organization dropdown, choose the Zoho Sheet workbook that should receive the rows. The list shows your own spreadsheets by name, such as Master Customer Data, and loads from your Zoho Sheet account.
Pick the right workbook before going further, because the next dropdown lists only the sheets inside it.
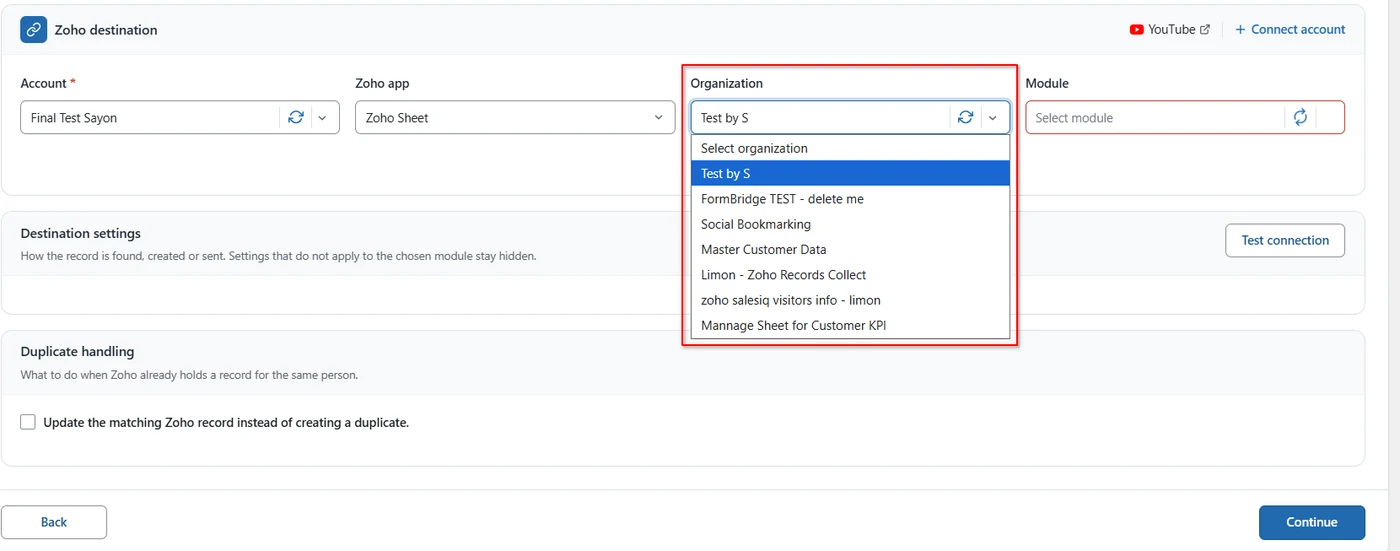
Choosing the Zoho Sheet workbook. Step 4: Select the sheet and what it should do
Destination › ModuleFrom the Module dropdown, choose the sheet inside that workbook and what the feed should do with it. Each sheet appears three times, once for each action:
- Sheet “…”: add a row — always appends a new row.
- Sheet “…”: update the matching row — only updates a row that already matches, and does nothing when none does.
- Sheet “…”: update the matching row, or add one — updates a match if there is one, and otherwise appends a new row.
Use the reload button beside the dropdown if a sheet you just added isn’t listed yet.
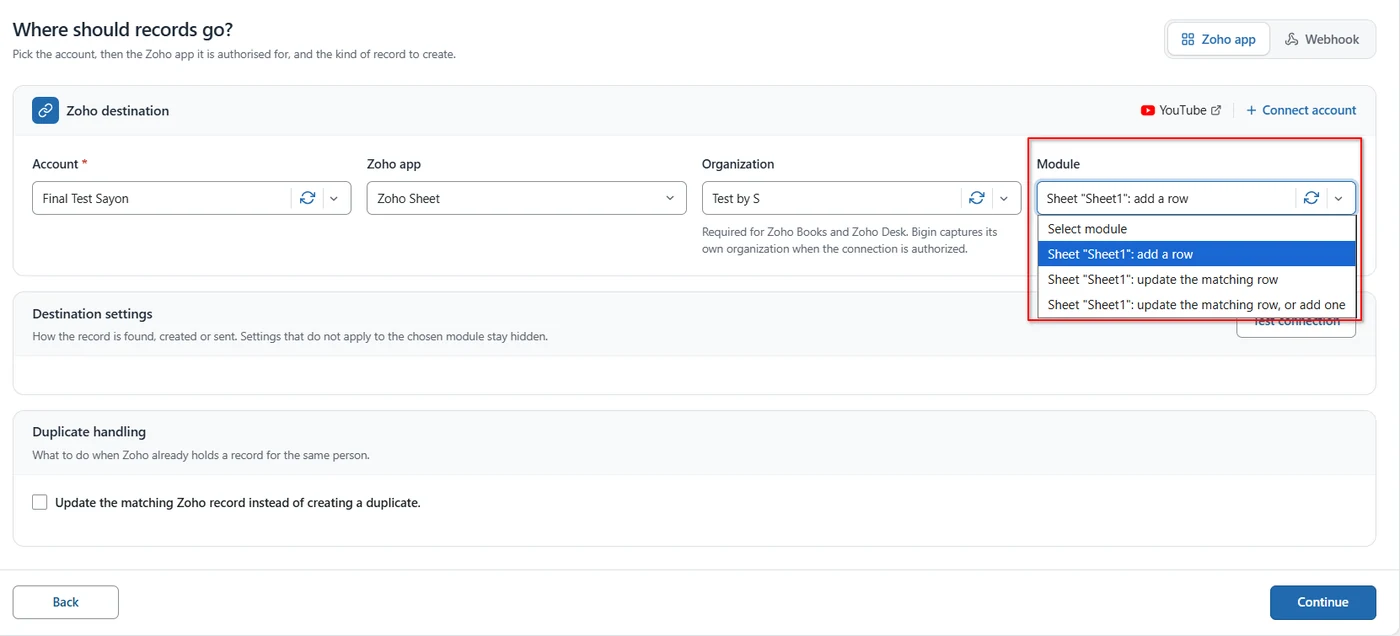
Choosing the sheet and the action. Step 5: Check the destination settings
Destination › Destination settingsThe Destination settings panel shows only the settings that apply to the action you chose, so it stays empty for a simple add a row feed. Click Test connection to confirm FormBridge can reach the workbook and sheet.
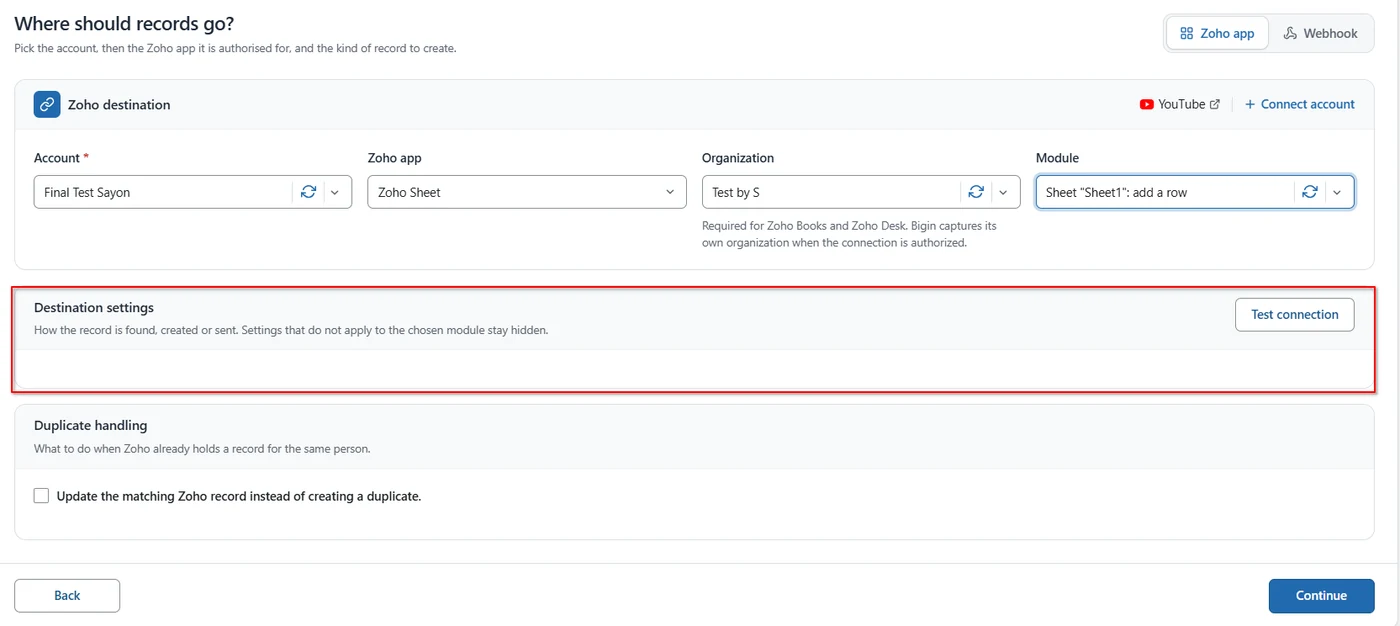
Checking the connection to the workbook. Step 6: Configure duplicate handling
Destination › Duplicate handlingUnder Duplicate handling, tick Update the matching Zoho record instead of creating a duplicate if an existing row should be updated rather than a second one appended. Then click Continue.
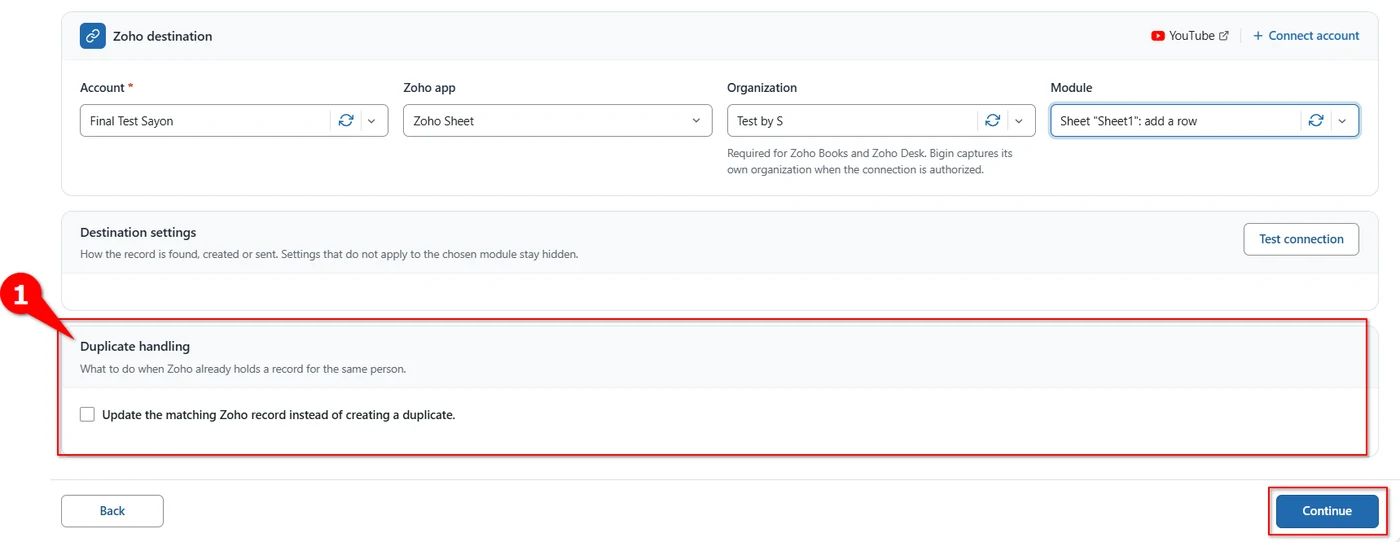
Configuring duplicate handling, then continuing to the mapping step. Step 7: Map your form fields to the columns
Mapping › Field mappingOn the Mapping step, give each column a form field. Both lists load on their own: the columns come from the sheet you chose, and the form fields from your form.
The Zoho field list here is your sheet’s own header row, so a column called Mobile appears by that name. Click Remove to drop a row you don’t need.
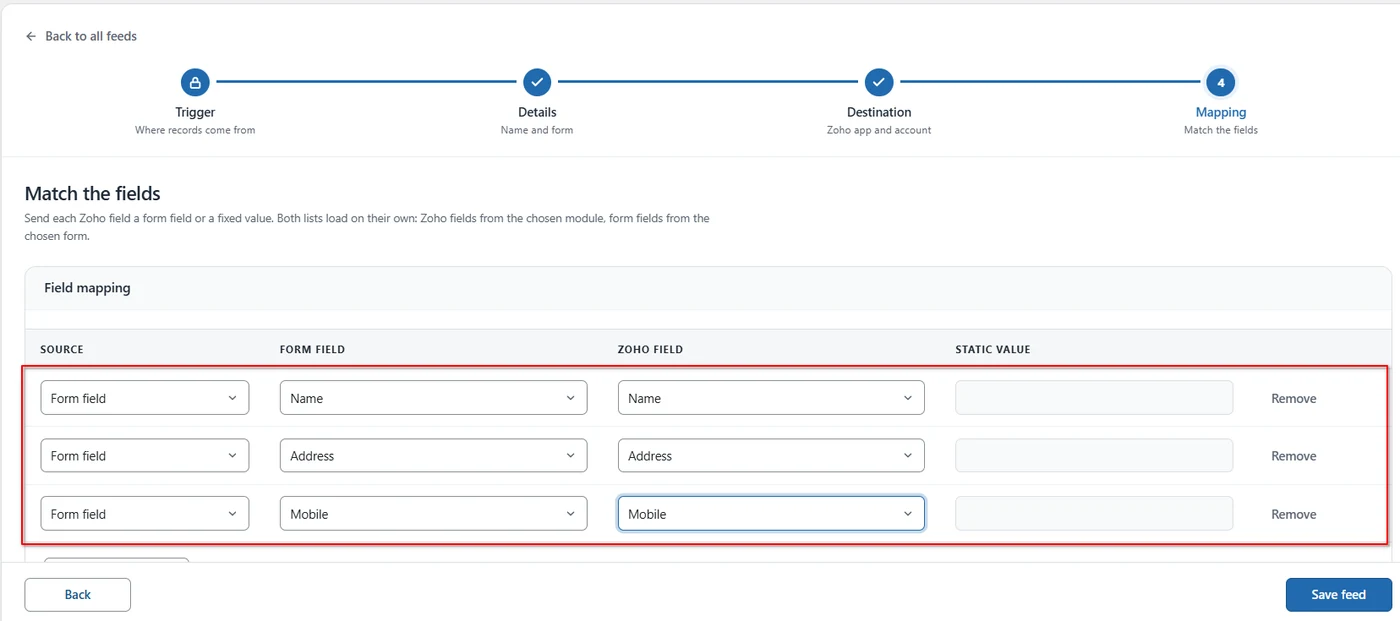
Mapping form fields to the sheet columns. Step 8: Send fixed values and add more rows
Mapping › Static valueClick + Add mapping row to fill more columns. To write the same value into a column on every submission, set Source to Static value: the form field column greys out and you type the value in the Static value box instead.
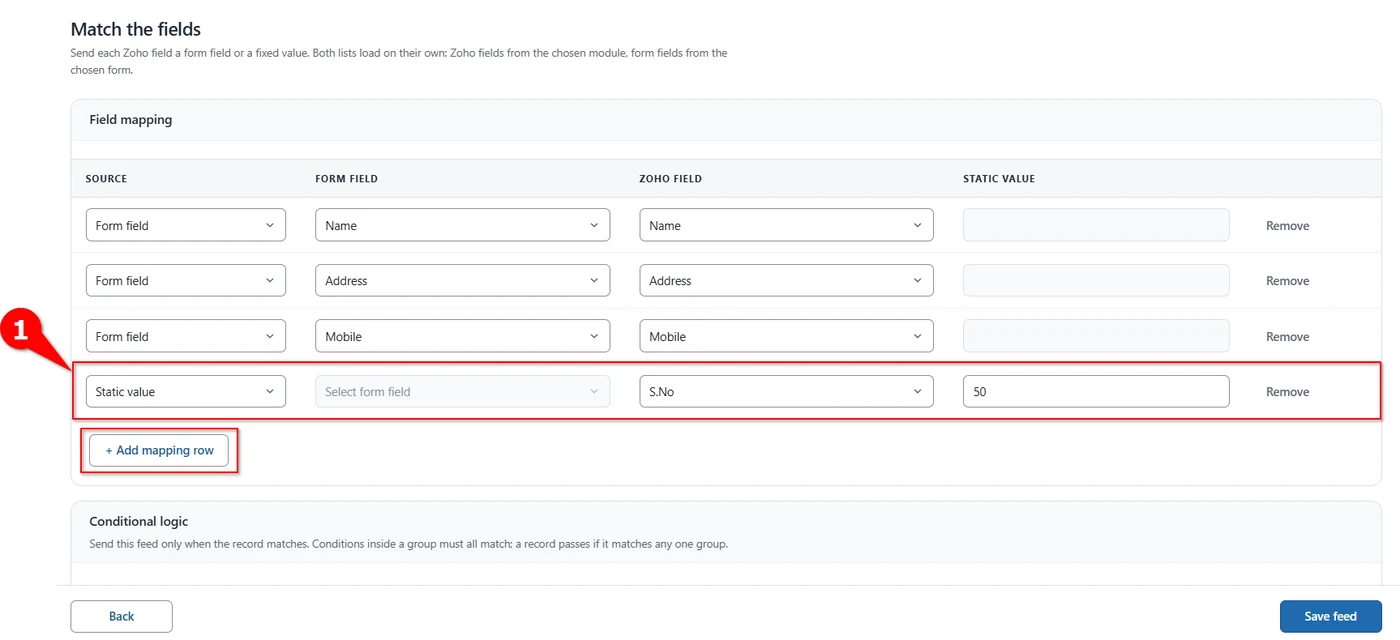
Writing a fixed value into a column. Step 9: Set conditional logic (optional)
Mapping › Conditional logicConditional logic lets a feed add only the rows you want. Turn on Only send when the conditions below match, then build your rules: conditions inside a group must all match, and a record passes if it matches any one group.
While the switch is off the feed sends every record it receives, and any rules you have written are kept but not applied.
Read the full conditional logic guide →
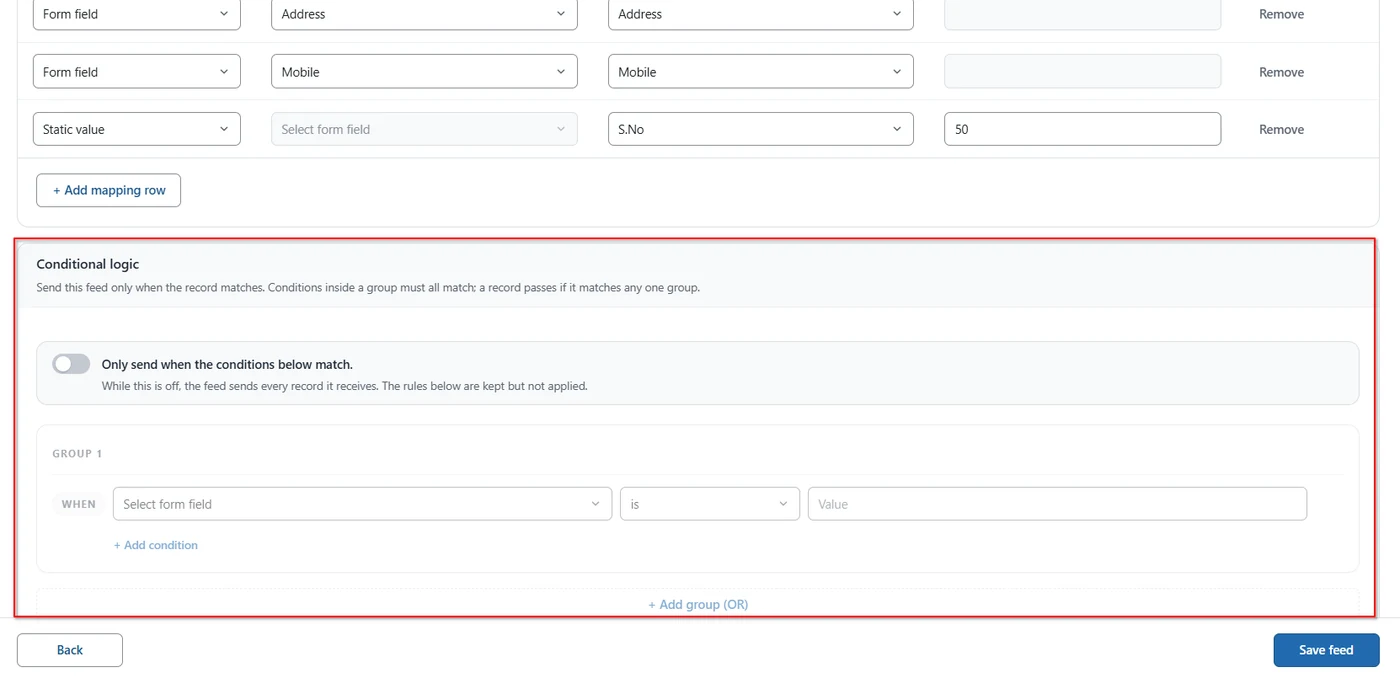
Setting conditional logic for the feed. Step 10: Test and save the feed
Mapping › Test this feedClick Send test record. FormBridge writes one real row to the sheet using the feed as last saved: static values go as they are, and mapped form fields are filled with realistic sample data. Open the workbook in Zoho Sheet to check that the row landed in the right columns.
When the test row looks right, click Save feed. The feed starts listening to the selected form straight away, so submit the real form once to confirm the whole flow.
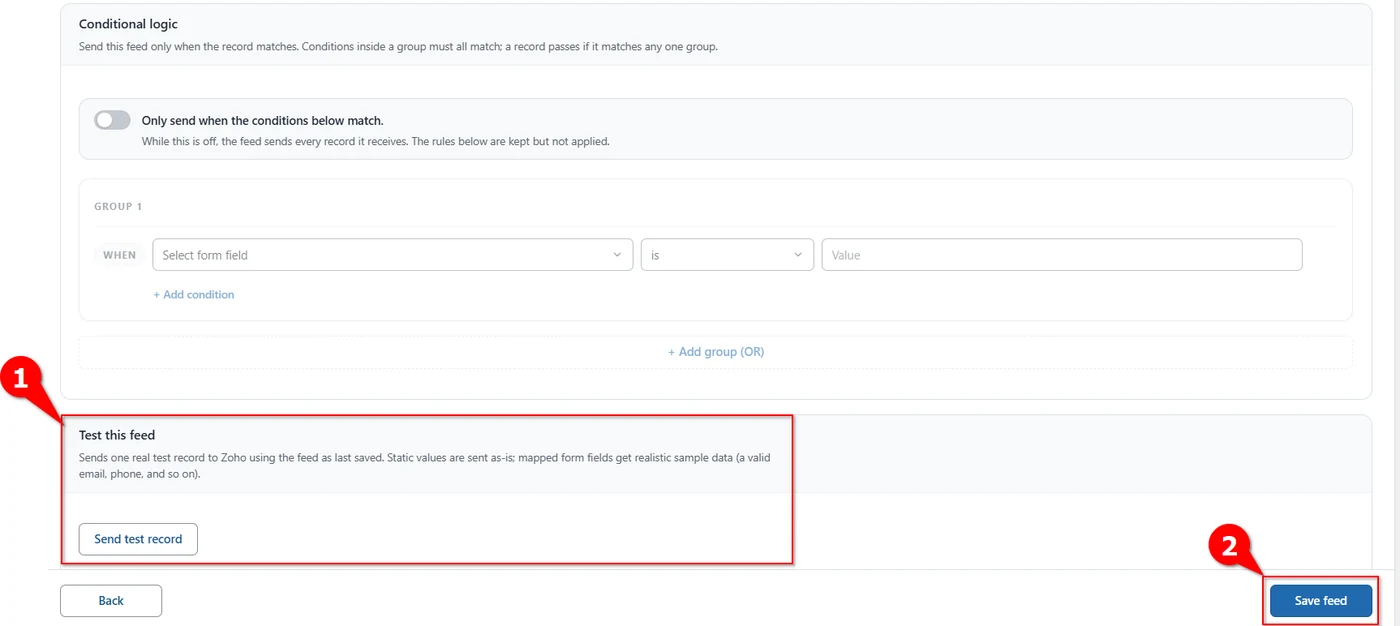
Sending a test row, then saving the feed. Delivery logsEvery delivery, successful or failed, is recorded under FormBridge for Zoho → Logs. Failed deliveries can be sent again with Resubmit.
- One feed listens to exactly one form. If two forms should write to Zoho Sheet, create two feeds.
- Changing the account, app, workbook or sheet after mapping clears the mapping rows, so set those first.
- Renaming a column in Zoho Sheet changes the field name here too, so check the mapping after you edit the header row.
Verify the integration
- Submit the real form using values you can recognise.
- Check the log under FormBridge for Zoho → Logs and confirm the delivery succeeded.
- Open the workbook and find the new row in the sheet you selected.
- Check the columns, making sure each value landed where you expect, including static values.
- Submit again to confirm the feed behaves as you set it in Step 4: appending a row, or updating the matching one.
Troubleshooting
Pick the symptom you’re seeing to get the fix.
No row is added
- Likely cause
- The action is set to update the matching row and nothing matched.
- How to fix it
- Choose update the matching row, or add one in Step 4 if a new row should be appended when there is no match. Then check the Logs screen.
Zoho Sheet missing from the dropdown
- Likely cause
- The connection was authorised before Sheet was added.
- How to fix it
- Open Connections → Edit access for the account, tick Zoho Sheet and reauthorise.
A workbook or sheet is missing
- Likely cause
- The list was loaded before the file existed, or a different workbook is selected.
- How to fix it
- Check the workbook in Step 3, then use the reload button beside the Module dropdown.
Values in the wrong columns
- Likely cause
- A mapping row points at the wrong column.
- How to fix it
- Open the mapping step and check each row against your sheet’s header row. The Zoho field list comes straight from those headers.
Duplicate rows
- Likely cause
- The action is add a row, or duplicate handling is off.
- How to fix it
- Choose an update action in Step 4, and tick the duplicate handling checkbox in Step 6.
Nothing reaches Zoho
- Likely cause
- Conditional logic is on and no record matches the rules.
- How to fix it
- Open the conditional logic panel and check the rules, or switch off Only send when the conditions below match to send every record.
Still stuck? Email the failed entry from the Logs screen to support@techwavesolutions.net.
Frequently asked questions
What is the difference between the three sheet actions?
Add a row always appends. Update the matching row only changes a row that already matches. Update the matching row, or add one changes a match when there is one, and appends a new row when there isn’t.
Where do the Zoho field names come from?
From your sheet’s own header row. Each column header appears in the Zoho field list, so name your headers clearly before you map.
Why does the Organization dropdown list my spreadsheets?
On a Zoho Sheet feed, that dropdown picks the workbook. The Module dropdown then lists only the sheets inside the workbook you chose.
What does Send test record do?
It writes one real row to the sheet using the feed as last saved. Static values are sent as they are, and mapped form fields are filled with realistic sample data.
Can two forms write to the same sheet?
Yes. Each feed listens to exactly one form, so create a separate feed for each form and point both at the same sheet.
